> ## Documentation Index
> Fetch the complete documentation index at: https://docs.cxconnect.ai/llms.txt
> Use this file to discover all available pages before exploring further.
# Salesforce Connector
> Sync cases and conversation data from Salesforce Service Cloud to cxconnect.ai
## Overview
The **Salesforce Connector** automatically syncs your service cases and conversation data from Salesforce Service Cloud to cxconnect.ai.
## What Data is Synced
The connector will sync the following information from your Salesforce account:
* **Cases**: Service cases including subject, description, status, and priority
* **Conversations**: Messaging conversation details from Salesforce Messaging
* **Messages**: Individual messages within each conversation
## Prerequisites
Before you begin, make sure you have:
1. Administrator access to your Salesforce account
This connector requires some technical setup in Salesforce. If you need assistance, please reach out to our support team.
## Required Information
You'll need to provide the following when setting up the connector:
| Field | What is it? | Where to find it |
| ----------- | --------------------------------------- | ------------------------------------------------- |
| Username | Salesforce integration user email | Your integration user's email |
| Client ID | Unique identifier from Connected App | Generated in Step 1 below |
| Certificate | Security certificate file | Provided by cxconnect.ai in Step 2 below |
| Is Sandbox | Whether you're using a test environment | Select "true" for sandbox, "false" for production |
## Setup Instructions
### Step 1: Create Connected App in Salesforce
First, you'll create a Connected App in Salesforce to generate the Client ID. We'll use this Client ID to generate your certificate.
#### 1. Log in to Salesforce as an administrator
#### 2. Go to **Setup** > **External Client App Manager**
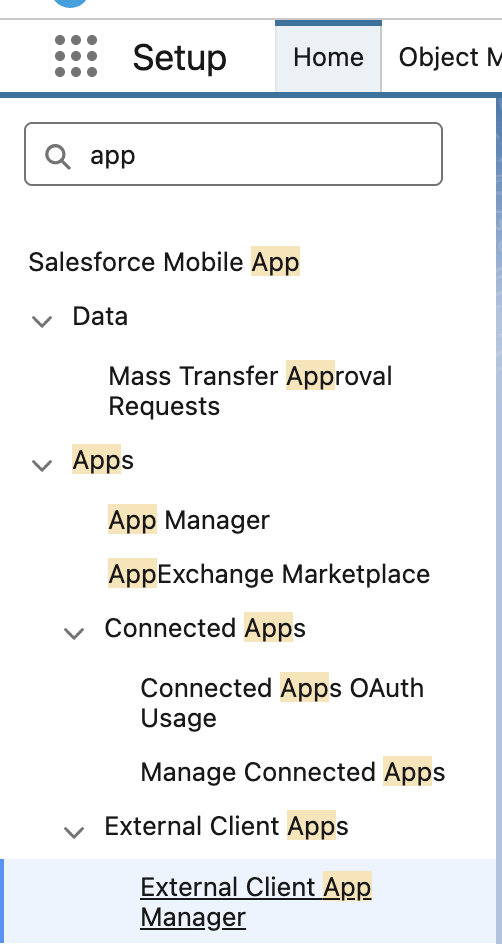 #### 3. Click **New External Client App**
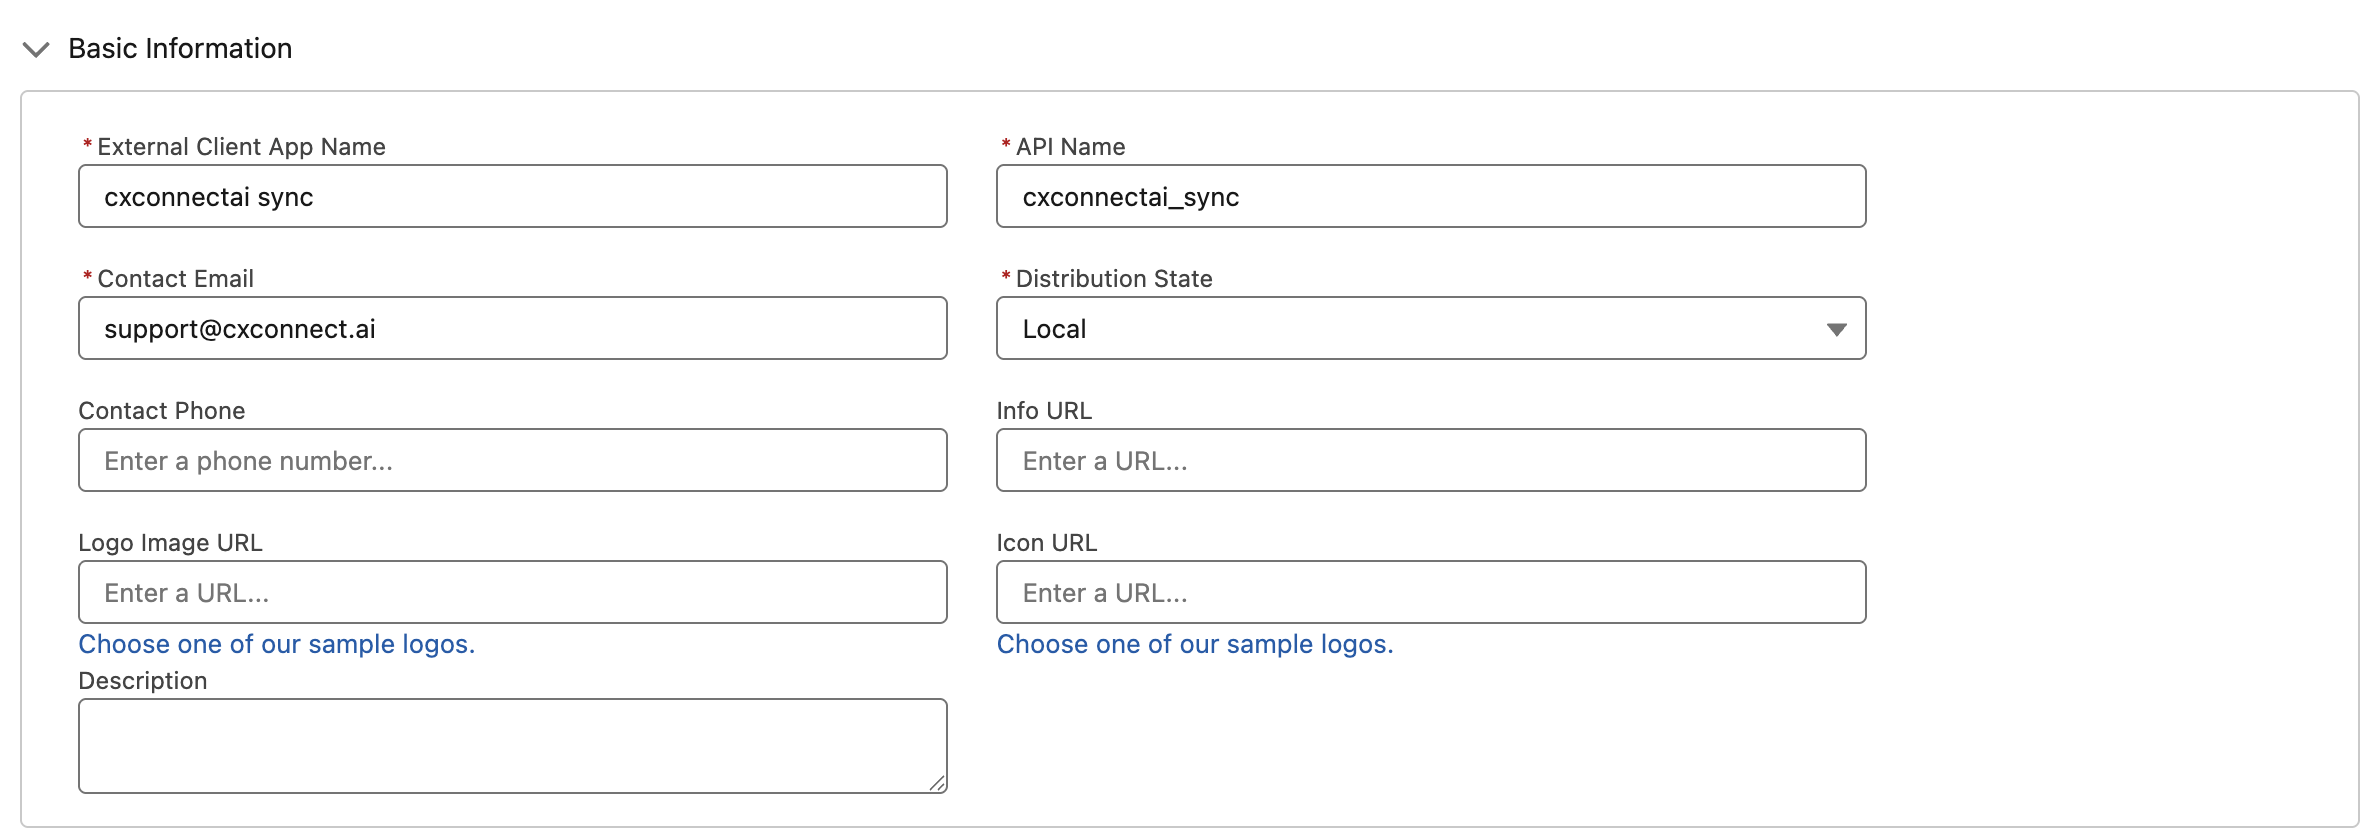
 #### 4. Fill in the details under Basic Information:
* **App Name**: `cxconnectai Sync`
* **Contact Email**: Your email address
* **Distribution State**: Local
#### 4. Fill in the details under Basic Information:
* **App Name**: `cxconnectai Sync`
* **Contact Email**: Your email address
* **Distribution State**: Local
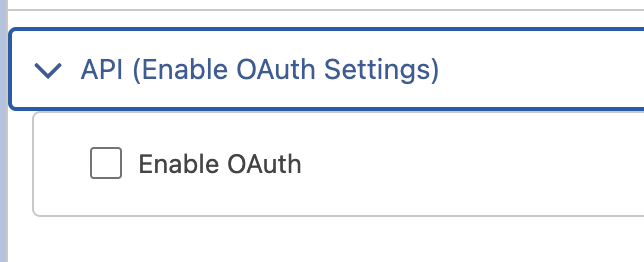
 #### 5. Under **API (Enable OAuth Settings)**:
* Check **Enable OAuth**
#### 5. Under **API (Enable OAuth Settings)**:
* Check **Enable OAuth**
 * **Callback URL**:
* For Production Enter: `https://api.cxconnect.ai/cortex`
* For Sandbox Enter: `https://test.api.cxconnect.ai/cortex`
* Select these OAuth scopes:
* Full access (full)
* Perform requests at any time (refresh\_token, offline\_access)
* Access the Salesforce API Platform (sfap\_api)
* Access Interaction API resources (interaction\_api)
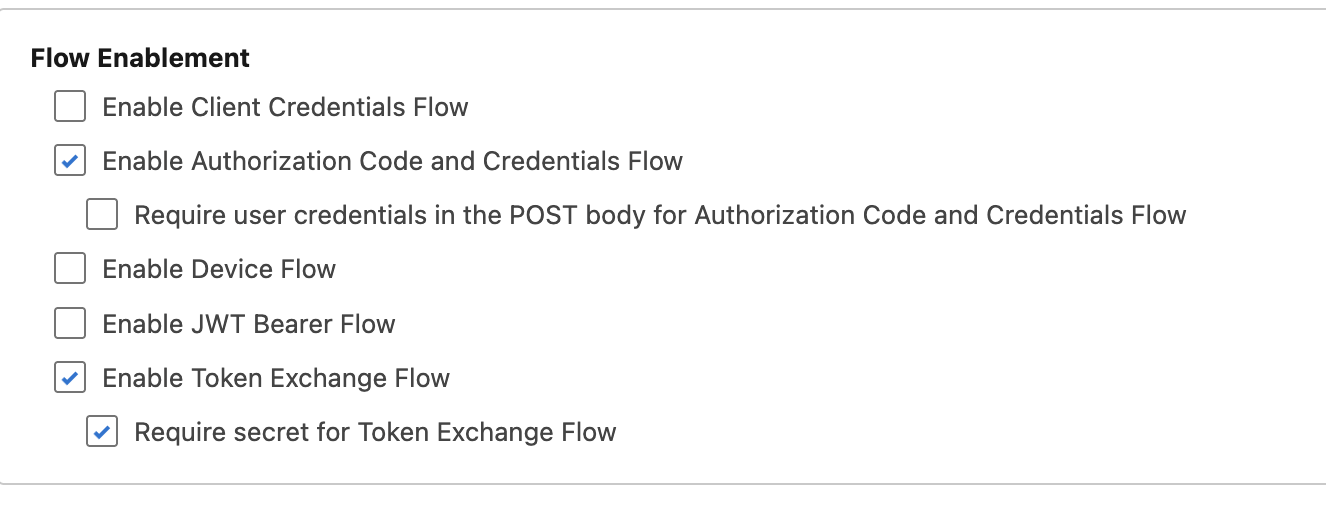
#### 6. Under **Flow Enablement**:
* Select the following:
* **Callback URL**:
* For Production Enter: `https://api.cxconnect.ai/cortex`
* For Sandbox Enter: `https://test.api.cxconnect.ai/cortex`
* Select these OAuth scopes:
* Full access (full)
* Perform requests at any time (refresh\_token, offline\_access)
* Access the Salesforce API Platform (sfap\_api)
* Access Interaction API resources (interaction\_api)
#### 6. Under **Flow Enablement**:
* Select the following:
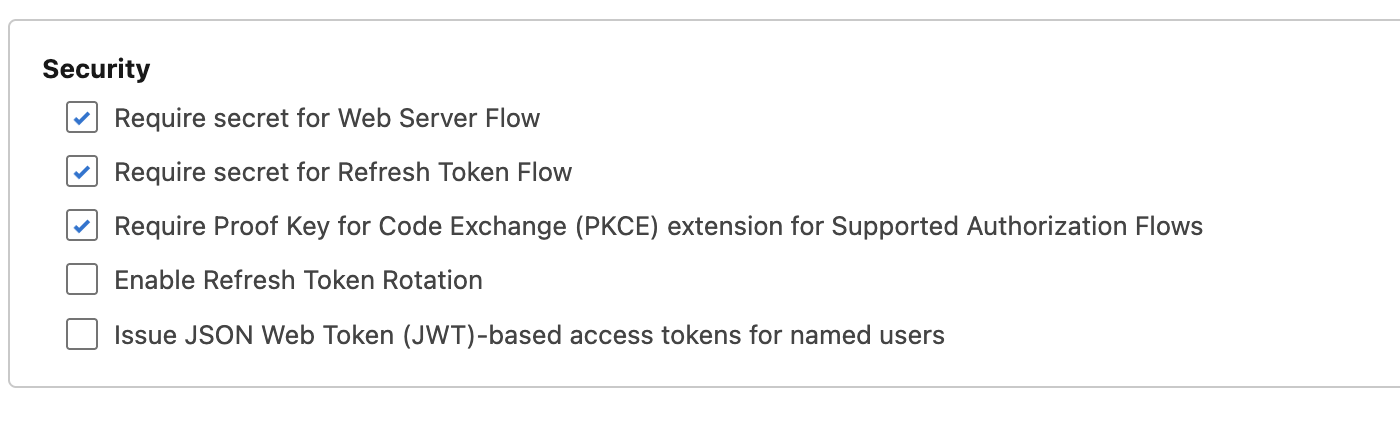
 #### 7. Under **Security**:
* Assure the following are selected:
#### 7. Under **Security**:
* Assure the following are selected:
 #### 8. Click **Create**
#### 9. Back under Settings > OAuth Settings:
* Click **Consumer Key and Secret**
#### 8. Click **Create**
#### 9. Back under Settings > OAuth Settings:
* Click **Consumer Key and Secret**
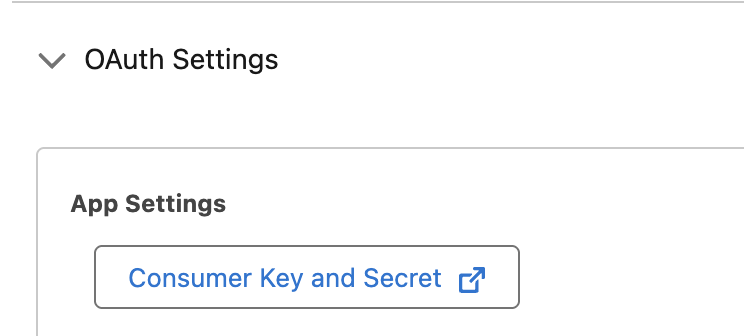 * Copy **Consumer Key**
Keep your Client Key handy - you'll need to provide it to cxconnect.ai in the next steps.
### Step 2: Set Up or Create Integration User
Make sure your integration user has these permissions through profile or permission set:
* API Enabled
* View All Data (or specific read access to Cases, Conversations, Email Messages)
* Access to Bulk API
### Step 3: Configure App Policies
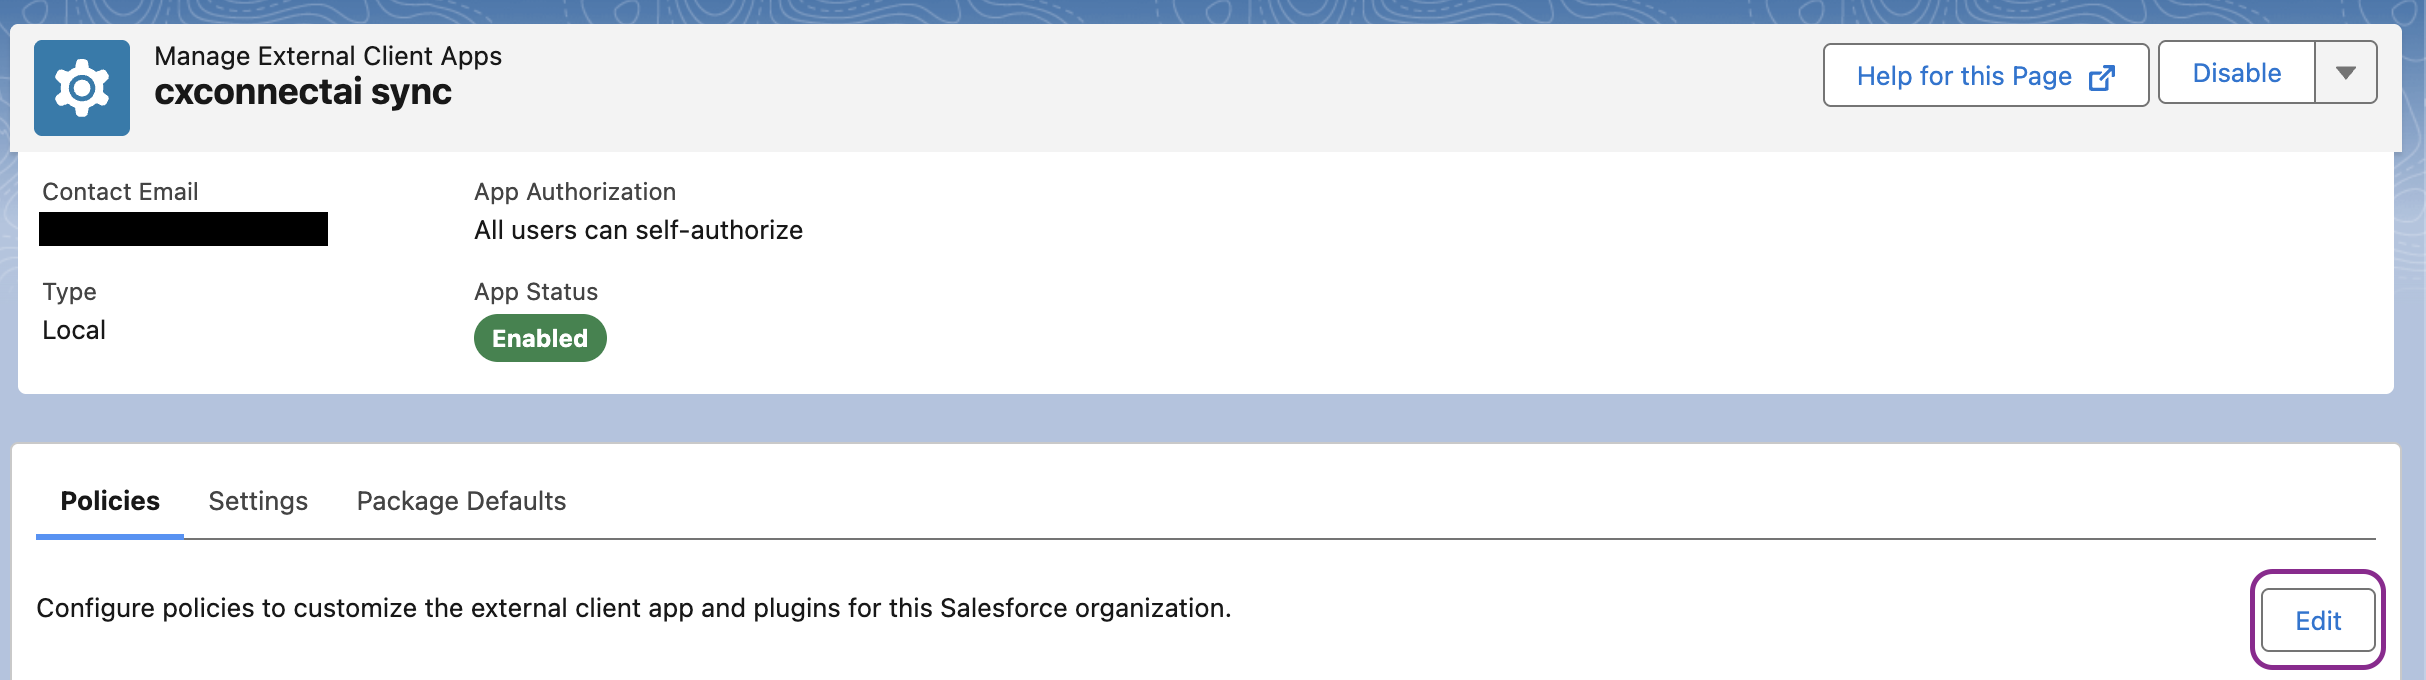
Return to External Client App created:
1. Click **Edit** under **Policies**
* Copy **Consumer Key**
Keep your Client Key handy - you'll need to provide it to cxconnect.ai in the next steps.
### Step 2: Set Up or Create Integration User
Make sure your integration user has these permissions through profile or permission set:
* API Enabled
* View All Data (or specific read access to Cases, Conversations, Email Messages)
* Access to Bulk API
### Step 3: Configure App Policies
Return to External Client App created:
1. Click **Edit** under **Policies**
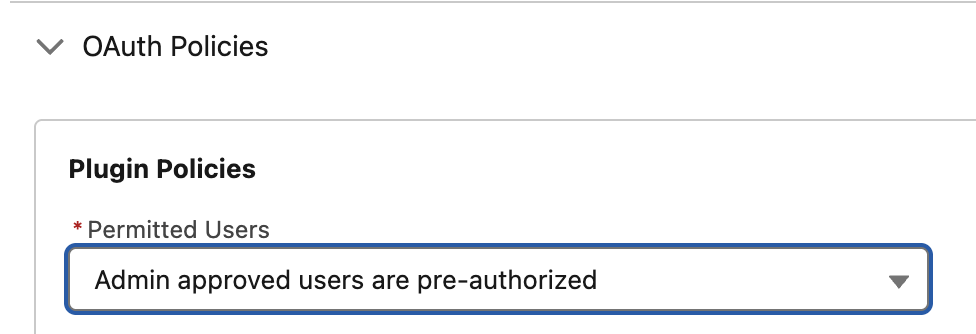
 2. Under **OAuth Policies**:
* Under **Permitted Users** select the option "Admin approved users are pre-authorized"
* Confirm the selection
2. Under **OAuth Policies**:
* Under **Permitted Users** select the option "Admin approved users are pre-authorized"
* Confirm the selection
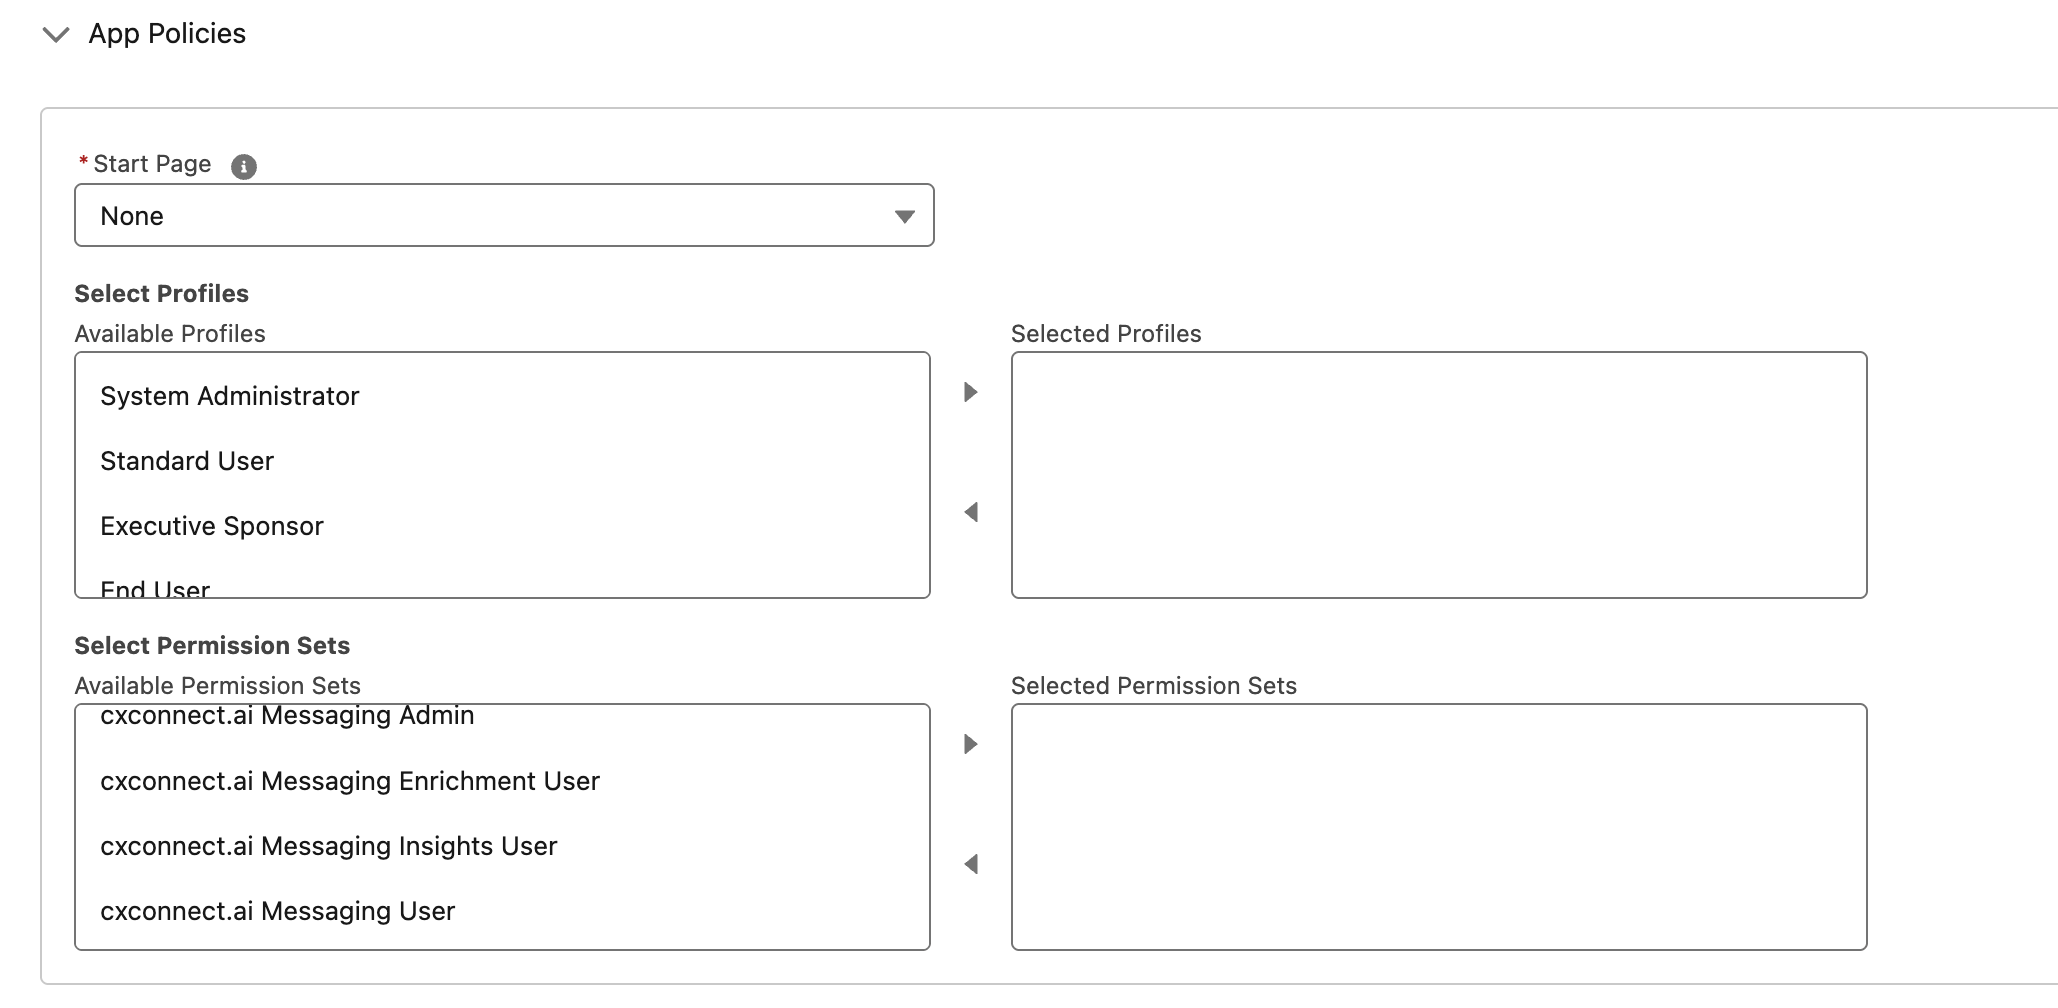
 3. Under **App Policies** there should now be profile and permission set options for pre-authorized users.
* Select a profile or permission set that has read access to the data being synced (Case, Email, Messaging, etc)
3. Under **App Policies** there should now be profile and permission set options for pre-authorized users.
* Select a profile or permission set that has read access to the data being synced (Case, Email, Messaging, etc)
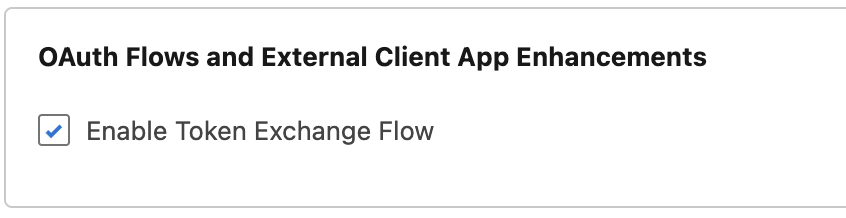
 4. Under **OAuth Flows and External Client App Enhancements**
* Check Enable Token Exchange Flow
4. Under **OAuth Flows and External Client App Enhancements**
* Check Enable Token Exchange Flow
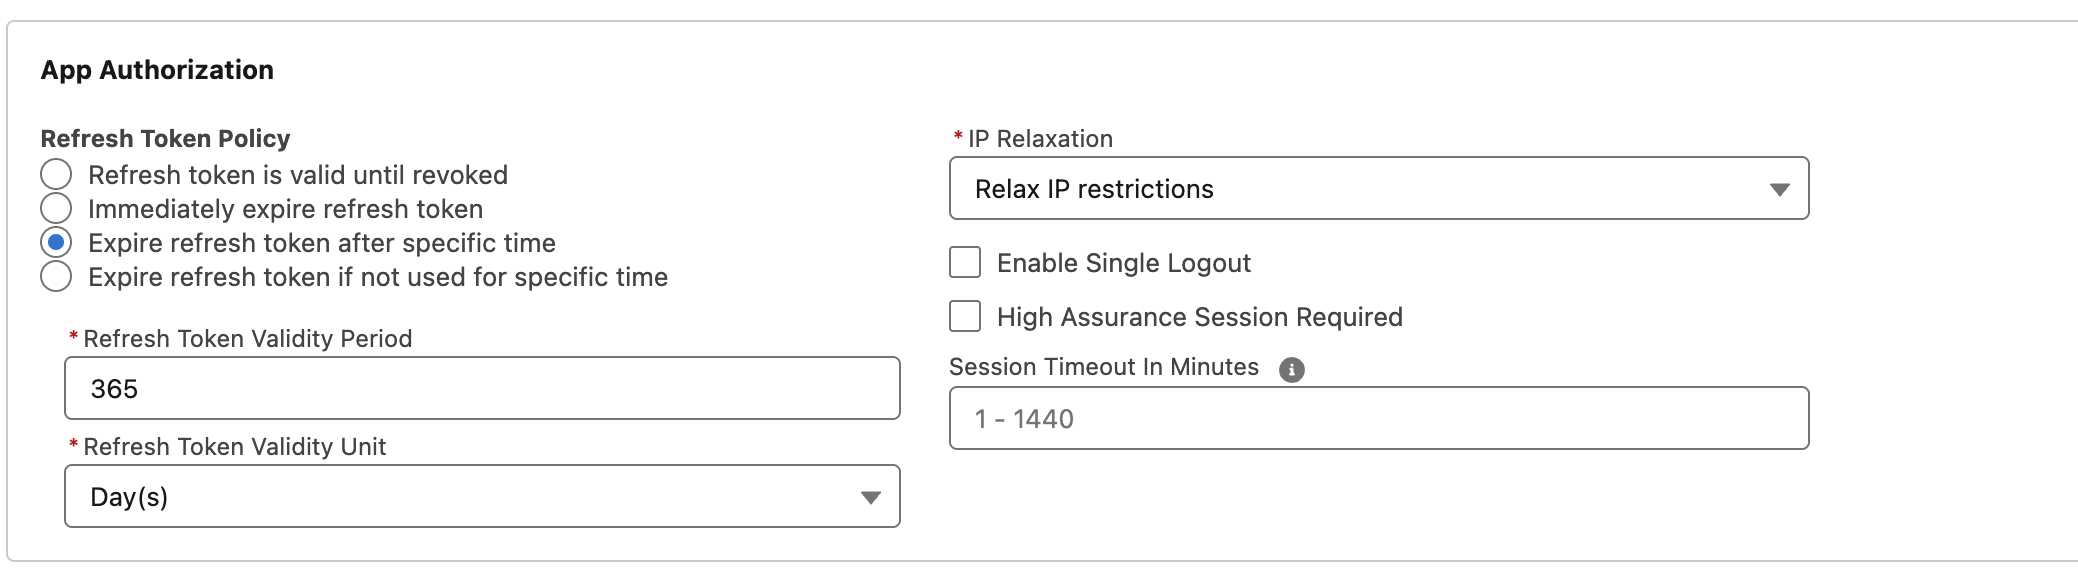
 5. Under **App Authorization**:
* Under *IP Relaxation* select: Relax IP restrictions
5. Under **App Authorization**:
* Under *IP Relaxation* select: Relax IP restrictions
 6. Click **Save**
### Step 4: Obtain Certificate from cxconnect.ai
Contact the cxconnect.ai support team with the following information. We will generate a certificate specifically for your Salesforce integration and send it to you.
* **Email Support**: [help@cxconnect.ai](mailto:help@cxconnect.ai)
* **What to include**:
* Your **Client ID** (Consumer Key) from Step 1
* Your **Username** (integration user email)
* Whether you're using a **Sandbox** environment (`true` for sandbox, `false` for production)
Keep your certificate file secure and never share it publicly or commit it to version control.
### Step 5: Upload Certificate to Salesforce
Once you receive the certificate file from cxconnect.ai:
1. Return to your External App.
2. Find your **cxconnectai Sync** Connected App
3. Under **Settings** select **Edit**
4. Scroll to **OAuth Settings** > **Flow Enablement**
5. Check the **Enable JWT Bearer Flow**
6. Click **Save**
### Step 4: Obtain Certificate from cxconnect.ai
Contact the cxconnect.ai support team with the following information. We will generate a certificate specifically for your Salesforce integration and send it to you.
* **Email Support**: [help@cxconnect.ai](mailto:help@cxconnect.ai)
* **What to include**:
* Your **Client ID** (Consumer Key) from Step 1
* Your **Username** (integration user email)
* Whether you're using a **Sandbox** environment (`true` for sandbox, `false` for production)
Keep your certificate file secure and never share it publicly or commit it to version control.
### Step 5: Upload Certificate to Salesforce
Once you receive the certificate file from cxconnect.ai:
1. Return to your External App.
2. Find your **cxconnectai Sync** Connected App
3. Under **Settings** select **Edit**
4. Scroll to **OAuth Settings** > **Flow Enablement**
5. Check the **Enable JWT Bearer Flow**
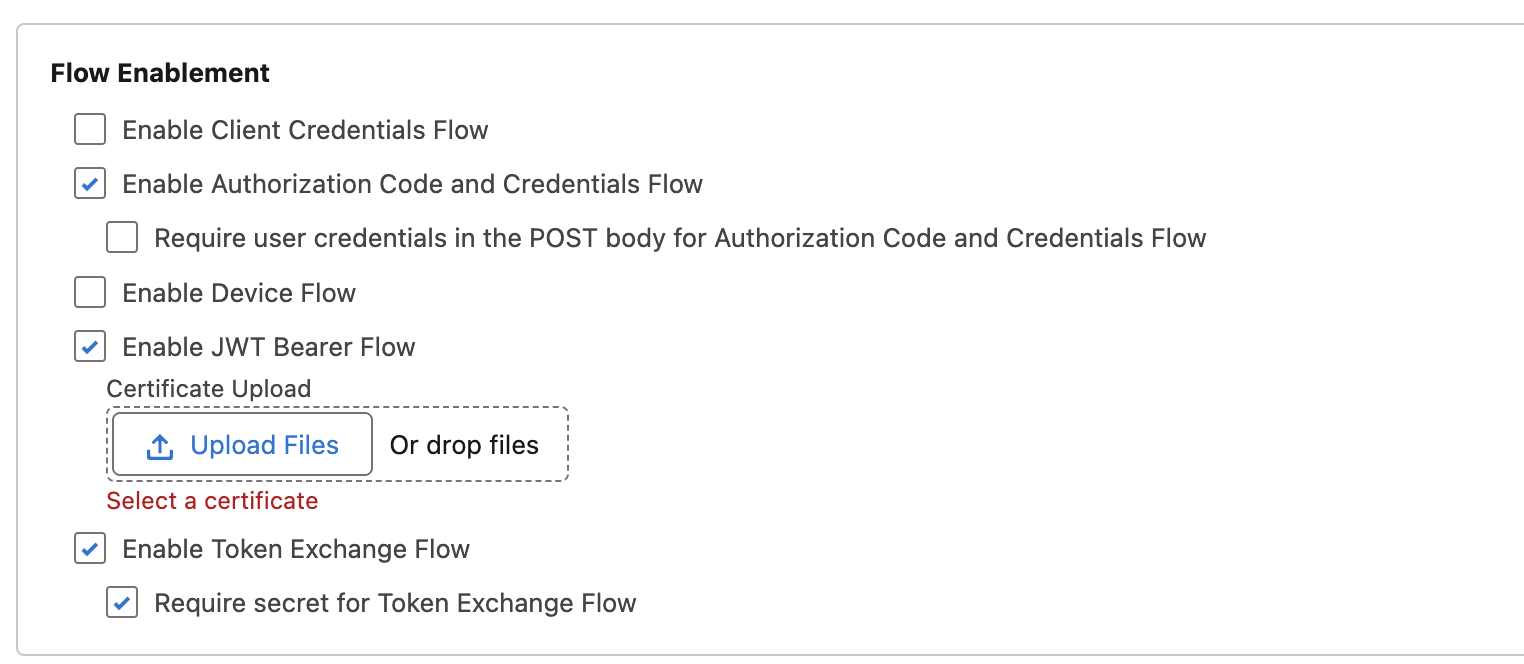 6. Click **Upload Files**
7. Select the certificate obtained from support in Step 4.
8. Click **Save**
### Step 6: Connect in cxconnect.ai Admin Portal
The Sync Engine and Admin Portal are currently in development and not yet deployed. Steps 6 and 7 will be available once the feature is released.
### Step 7: Monitor Your Sync
Once activated, the connector will automatically sync your data:
* Initial sync may take some time depending on data volume
* Monitor progress in the Admin Portal dashboard
* Check sync logs for any issues
## Troubleshooting
### Connection Issues
**Problem**: Unable to connect or authenticate
**What to check**:
* Verify the certificate file uploaded to Salesforce matches the one provided by cxconnect.ai
* Make sure the username exactly matches your Salesforce user (case-sensitive)
* Check that the user is pre-authorized in the Connected App
* Confirm the "Is Sandbox" setting matches your Salesforce environment
* Verify the Consumer Key (Client ID) is correct
### Permission Errors
**Problem**: Connection works but can't access data
**What to check**:
* Ensure the integration user has "API Enabled" permission
* Verify the user has read access to Cases and Conversations
* Check that the Connected App is assigned to the user
* Make sure the user has Bulk API access
### Missing Data
**Problem**: Some cases or conversations aren't syncing
**What to check**:
* Verify Salesforce Messaging is enabled if syncing conversations
* Check that the integration user has access to the records
* Ensure records exist in the date range being synced
* Contact support if data consistently appears to be missing
### Certificate Issues
**Problem**: Authentication fails with certificate errors
**What to check**:
* Confirm you uploaded the certificate provided by cxconnect.ai to Salesforce
* Make sure the certificate hasn't expired
* Verify you used the correct Client ID when requesting the certificate
* Contact cxconnect.ai support if certificate issues persist
## Need Help?
This connector requires technical setup. If you need assistance:
* **Email Support**: [help@cxconnect.ai](mailto:help@cxconnect.ai) (we can help walk you through the setup)
* **Salesforce Documentation**: [Salesforce Developer Docs](https://developer.salesforce.com/docs)
6. Click **Upload Files**
7. Select the certificate obtained from support in Step 4.
8. Click **Save**
### Step 6: Connect in cxconnect.ai Admin Portal
The Sync Engine and Admin Portal are currently in development and not yet deployed. Steps 6 and 7 will be available once the feature is released.
### Step 7: Monitor Your Sync
Once activated, the connector will automatically sync your data:
* Initial sync may take some time depending on data volume
* Monitor progress in the Admin Portal dashboard
* Check sync logs for any issues
## Troubleshooting
### Connection Issues
**Problem**: Unable to connect or authenticate
**What to check**:
* Verify the certificate file uploaded to Salesforce matches the one provided by cxconnect.ai
* Make sure the username exactly matches your Salesforce user (case-sensitive)
* Check that the user is pre-authorized in the Connected App
* Confirm the "Is Sandbox" setting matches your Salesforce environment
* Verify the Consumer Key (Client ID) is correct
### Permission Errors
**Problem**: Connection works but can't access data
**What to check**:
* Ensure the integration user has "API Enabled" permission
* Verify the user has read access to Cases and Conversations
* Check that the Connected App is assigned to the user
* Make sure the user has Bulk API access
### Missing Data
**Problem**: Some cases or conversations aren't syncing
**What to check**:
* Verify Salesforce Messaging is enabled if syncing conversations
* Check that the integration user has access to the records
* Ensure records exist in the date range being synced
* Contact support if data consistently appears to be missing
### Certificate Issues
**Problem**: Authentication fails with certificate errors
**What to check**:
* Confirm you uploaded the certificate provided by cxconnect.ai to Salesforce
* Make sure the certificate hasn't expired
* Verify you used the correct Client ID when requesting the certificate
* Contact cxconnect.ai support if certificate issues persist
## Need Help?
This connector requires technical setup. If you need assistance:
* **Email Support**: [help@cxconnect.ai](mailto:help@cxconnect.ai) (we can help walk you through the setup)
* **Salesforce Documentation**: [Salesforce Developer Docs](https://developer.salesforce.com/docs)