> ## Documentation Index
> Fetch the complete documentation index at: https://docs.cxconnect.ai/llms.txt
> Use this file to discover all available pages before exploring further.
# Base Application
> The installation guide for the cxconnect.ai base app for Salesforce
# Base App Install Steps
## *Step 1: Install the cxconnect.ai App for Salesforce*
In order to successfully translate your customers', suppliers' and employees' Cases/Accounts/Leads etc, you must first install the **cxconnect.ai Base App** into your Salesforce instance.
## *Latest Release*
The [cxconnect.ai Base App](../../../../changelog/salesforce/releases/base-app)
## *Step 2 Option A: Assign Permission Set Groups*
The cxconnect.ai App for Salesforce comes with three permission set groups.
1. **cxconnect.ai Admin Permission Set Group**: Includes all the permissions required for managing translation configurations.
2. **cxconnect.ai User Permission Set Group**: Includes all the permissions required for users using cxconnect.ai translation service.
3. **cxconnect.ai Guest User Permission Set Group**: Includes all the permissions required for guest users using cxconnect.ai translation service. For guest users in addition to this
These groups come with corresponding permission sets (referenced in [Step 2 Option B](#step-2-option-b:-assign-permission-sets)) already added. It is recommended users are assigned to these groups instead of individual permission sets to allow for easy expansion if utilizing the other cxconnect.ai Salesforce packages.
## *Step 2 Option B: Assign Permission Sets*
The cxconnect.ai App for Salesforce comes with three permission sets.
4. **cxconnect.ai Admin Permissions**: Includes all the permissions required for managing translation configurations.
5. **cxconnect.ai User Permissions**: Includes all the permissions required for users using cxconnect.ai translation service.
6. **cxconnect.ai Guest User Permissions** : Includes all the permissions required for guest users using cxconnect.ai translation service. For guest users in addition to this permission set you will have to *create sharing rules on Translation Object to enable guest users to read translation rules*.
Follow below instructions to assign permissions correctly.
1. Click on the "cxconnect.ai Admin Permissions" permission set in the search results.
2. Click on the "Manage Assignments" button.
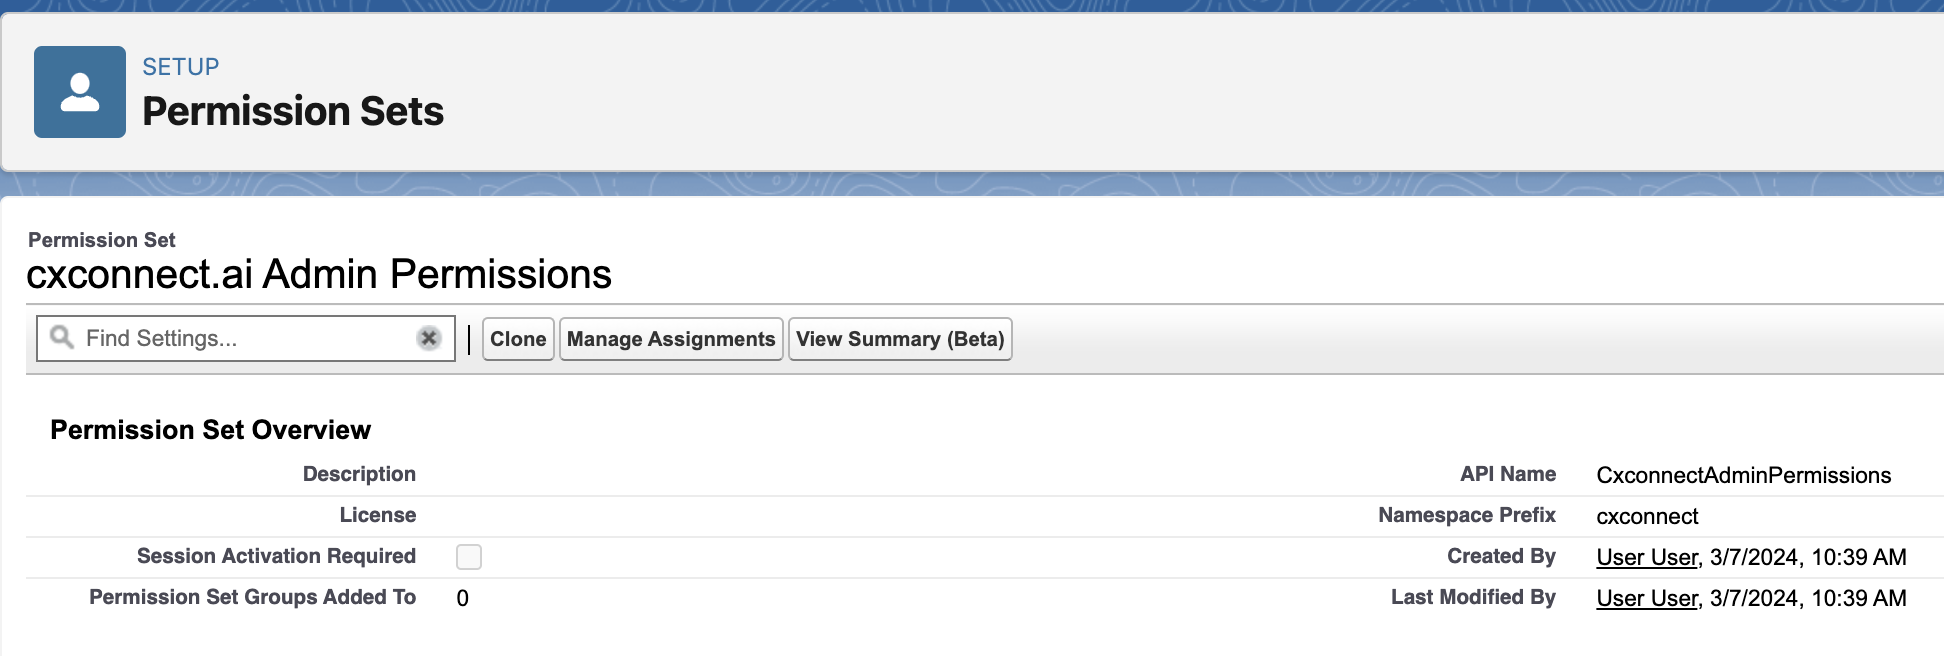 3. Click on the "Add Assignment" button.
4. Select the users you want to assign the permission set to and click on the "Assign" button.
5. To create a sharing rule for guest users in Salesforce, follow these steps
1. Go to Setup in Salesforce
2. Under "Administration," click on "Security Controls" and then "Sharing Settings"
3. Scroll down to "Guest User Sharing Rules" and click "New"
4. Select the “Translation Object” object to share.
5. Choose the “Read only” access level for the guest user
6. Define the criteria for when the sharing rule should apply
7. Click "Save”
## Step 3: Configure Translation Settings
1. From Setup, enter “Custom Metadata Types” in the Quick Find box, then select “Custom Metadata Types”
3. Click on the "Add Assignment" button.
4. Select the users you want to assign the permission set to and click on the "Assign" button.
5. To create a sharing rule for guest users in Salesforce, follow these steps
1. Go to Setup in Salesforce
2. Under "Administration," click on "Security Controls" and then "Sharing Settings"
3. Scroll down to "Guest User Sharing Rules" and click "New"
4. Select the “Translation Object” object to share.
5. Choose the “Read only” access level for the guest user
6. Define the criteria for when the sharing rule should apply
7. Click "Save”
## Step 3: Configure Translation Settings
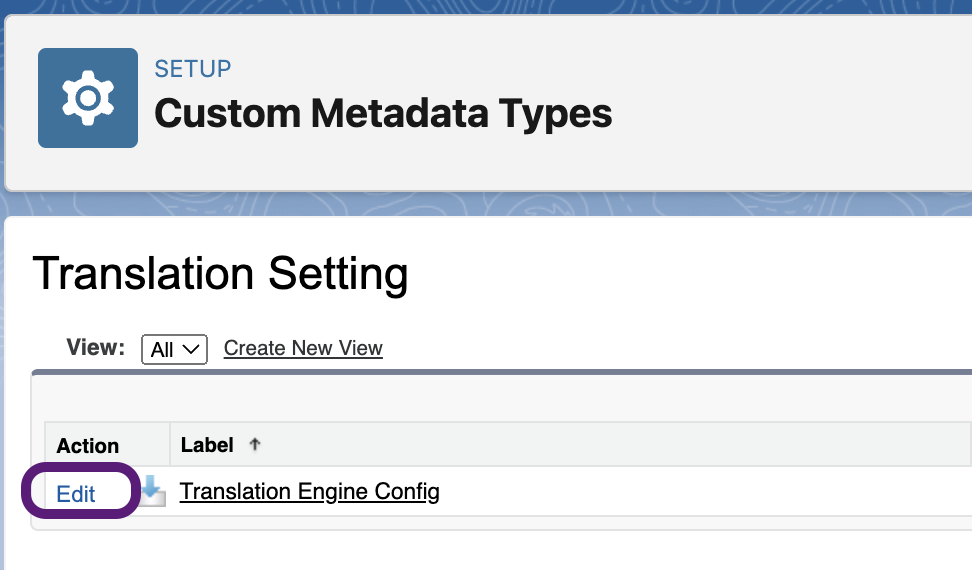
1. From Setup, enter “Custom Metadata Types” in the Quick Find box, then select “Custom Metadata Types”
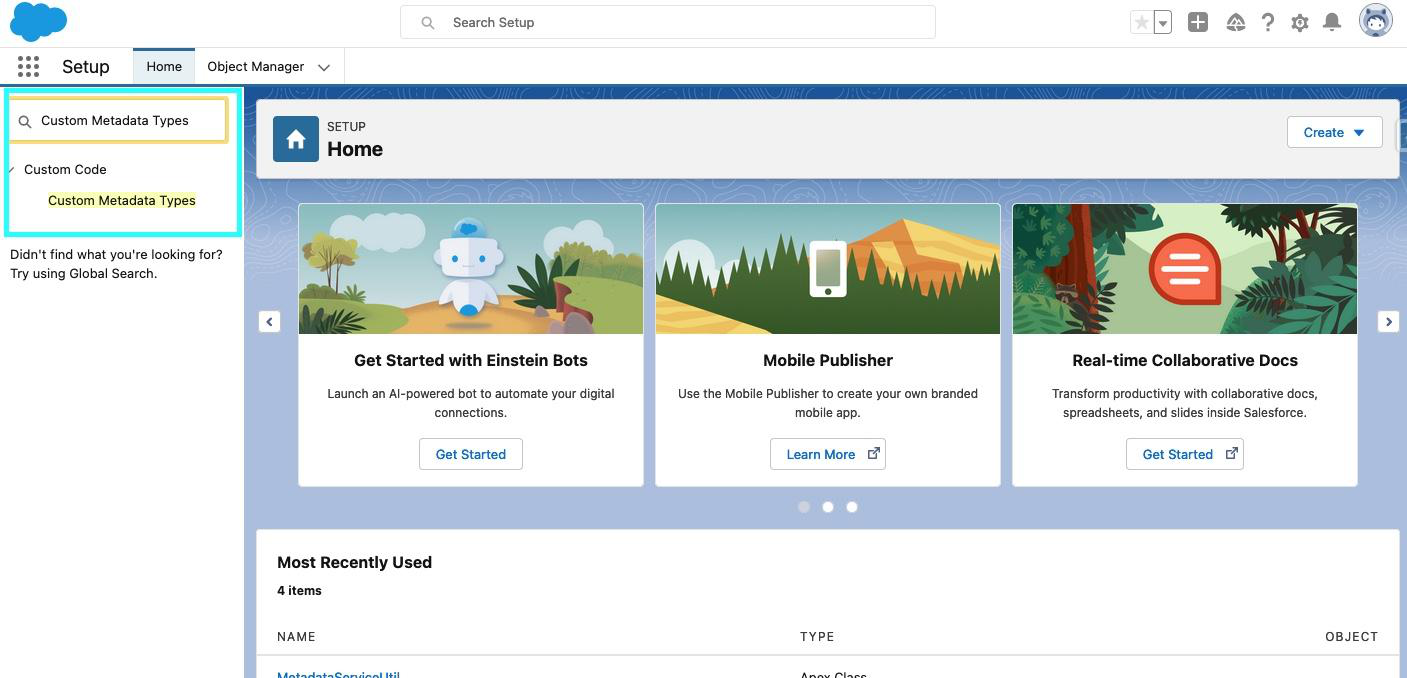 2. Select “Manage Records” to configure the Translation Setting
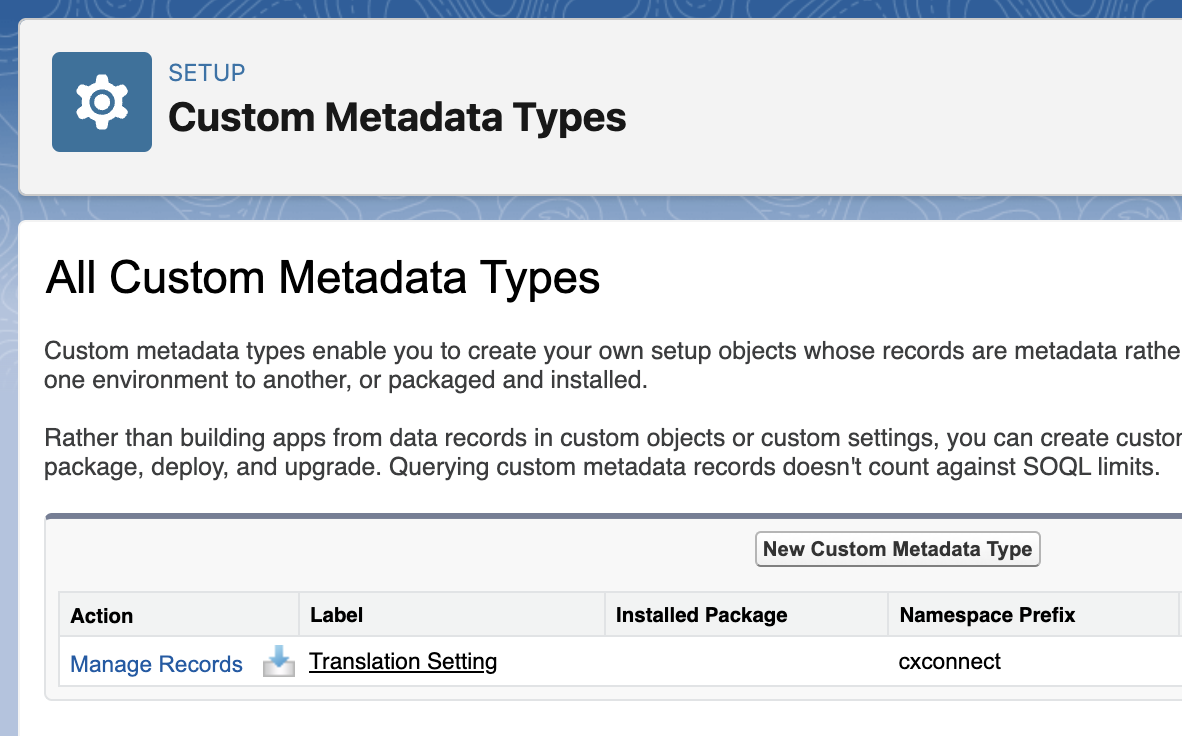 3. Edit “Translation Engine Config” translation setting custom metadata record
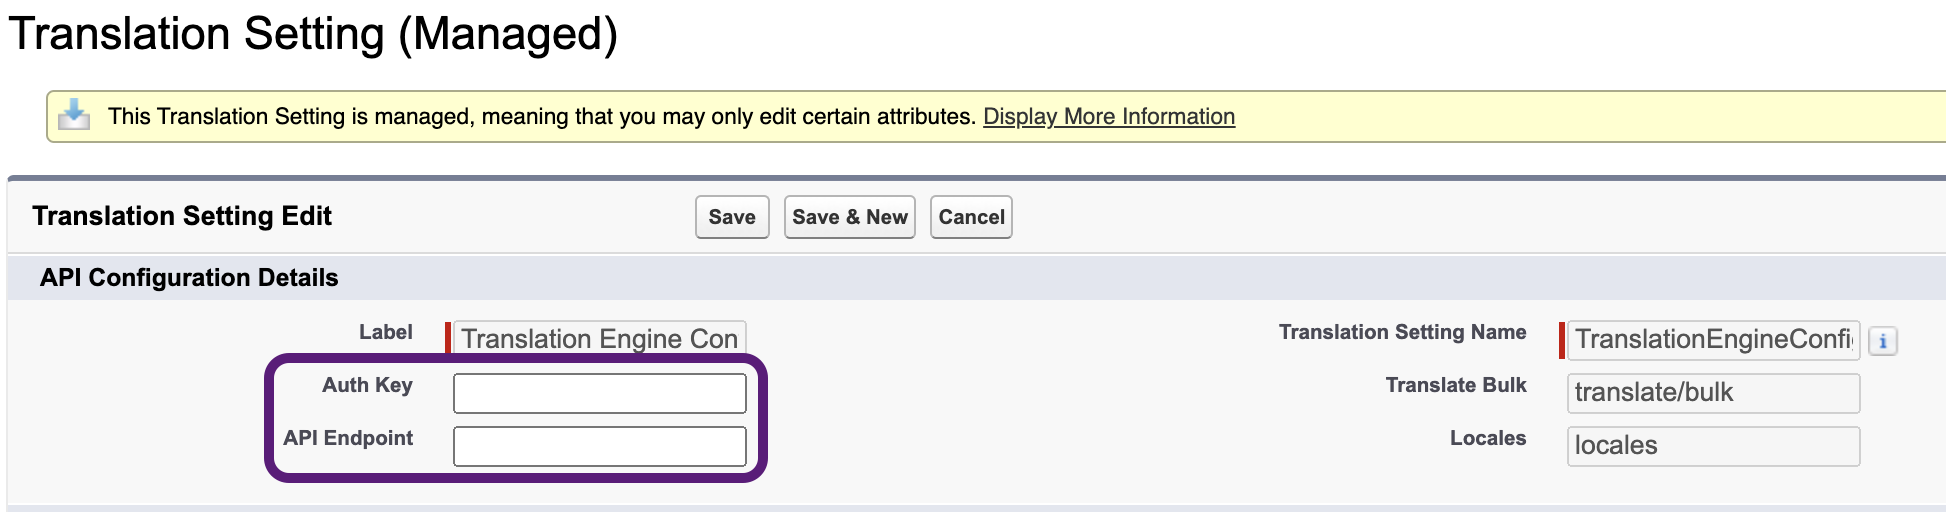
 4. Update “Auth Key” and “API Endpoint” information provided by cxconnect.ai and click save. The test endpoint is: [https://test.api.cxconnect.ai](https://test.api.cxconnect.ai) and the production endpoint is: [https://api.cxconnect.ai](https://api.cxconnect.ai)
 ## *Step 4: Setup Remote Site Settings*
Add the given API Endpoint to remote site settings by navigating to Setup > Remote Site Settings > New Remote Site
* Remote Site Name : cxconnect\_ai (or something similar)
* Remote Site URL: \
* Active : true
## *Step 4: Setup Remote Site Settings*
Add the given API Endpoint to remote site settings by navigating to Setup > Remote Site Settings > New Remote Site
* Remote Site Name : cxconnect\_ai (or something similar)
* Remote Site URL: \
* Active : true
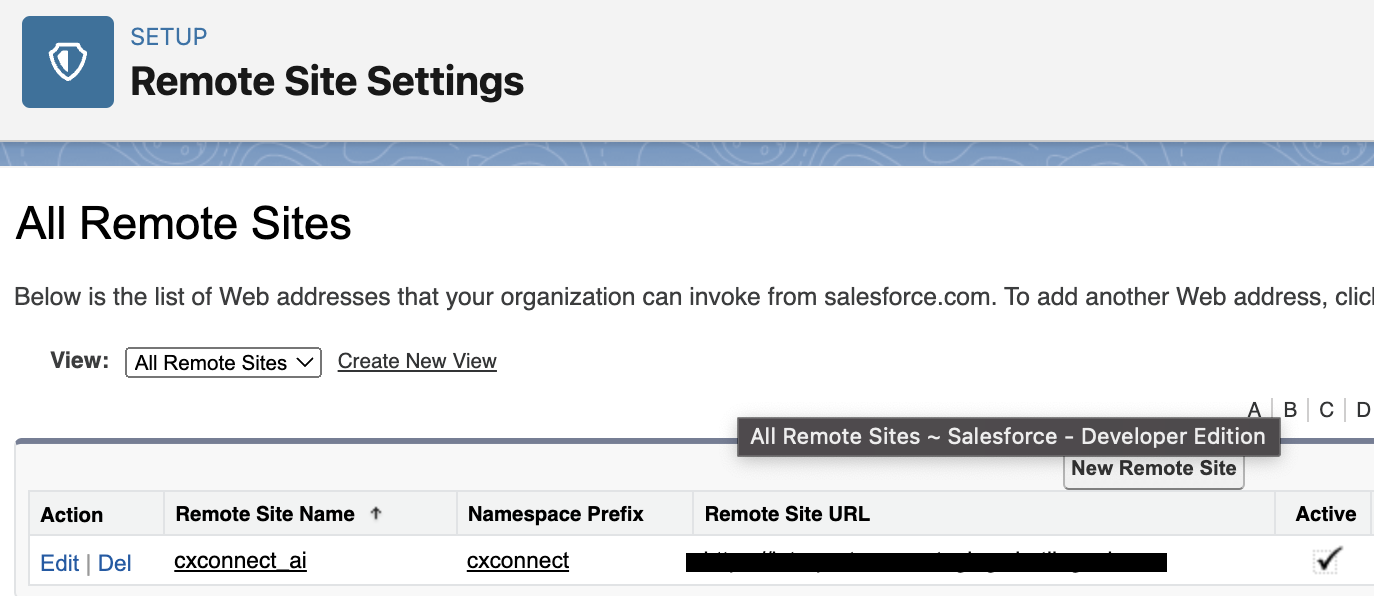 This will allow your Salesforce instance to communicate with cxconnect.ai servers.
## *Step 5: Select cxconnect.ai App*
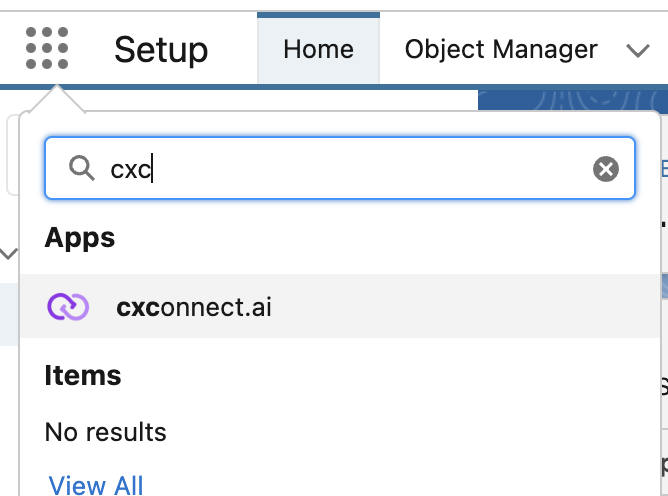
Select cxconnect.ai from the app menu.
This will allow your Salesforce instance to communicate with cxconnect.ai servers.
## *Step 5: Select cxconnect.ai App*
Select cxconnect.ai from the app menu.
 ## *Step 6: Configure Translation Objects*
1. Select Translation Objects Tab.
## *Step 6: Configure Translation Objects*
1. Select Translation Objects Tab.
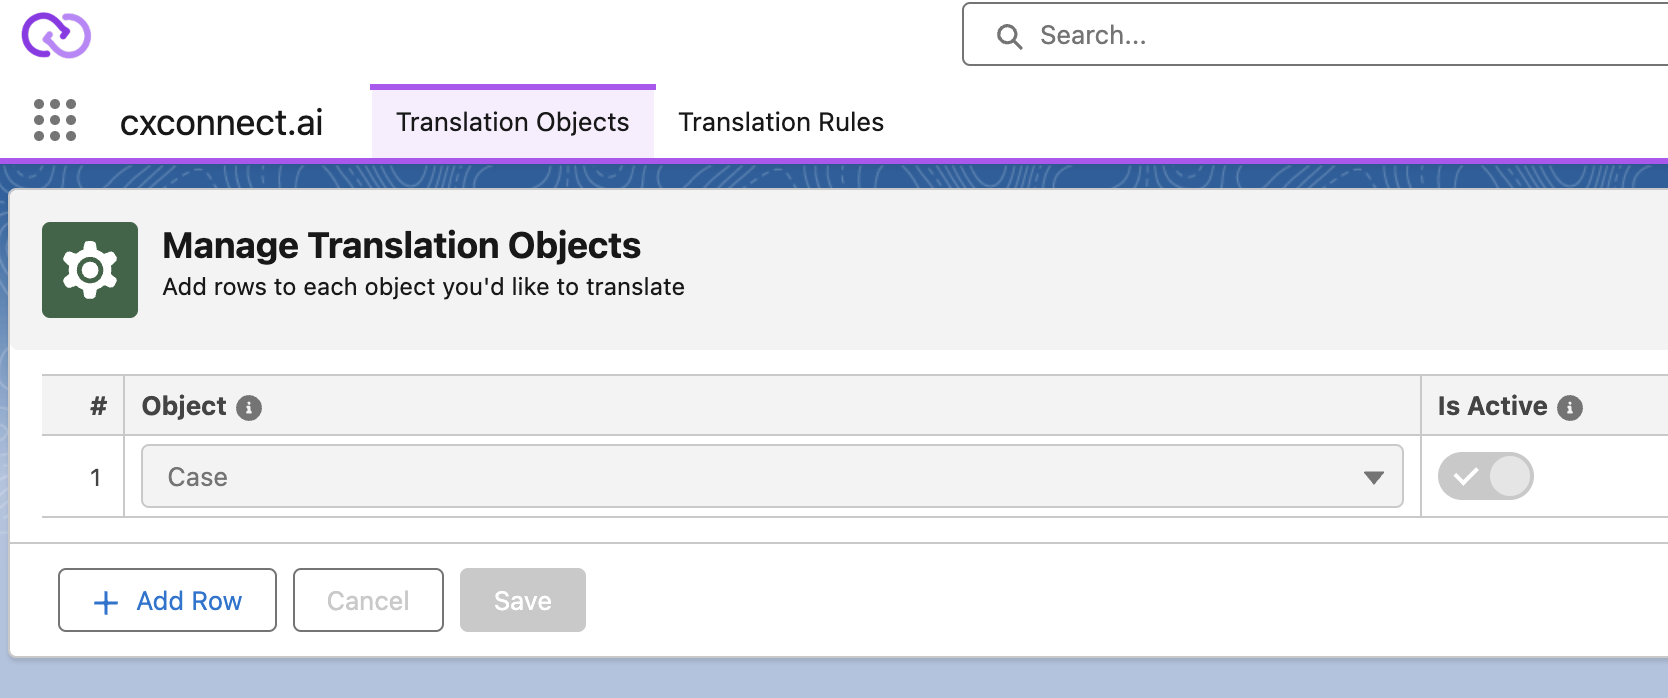
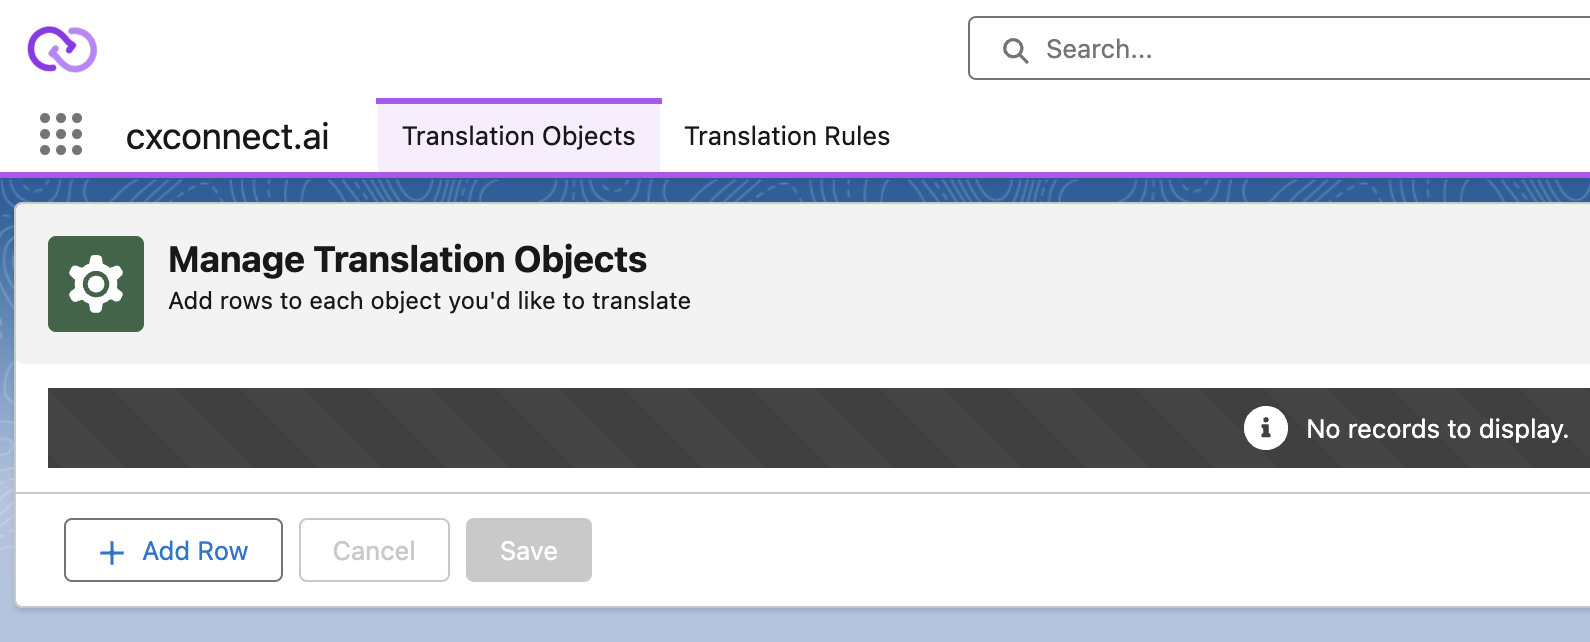 2. Add objects that you want to enable translation for by clicking the “**Add Row**” button. For this example we will be using the *Case* object. NOTE: Knowledge article records should not be selected or managed here. Please use the [Knowledge App](#knowledge-app-installation-and-setup) to handle these translations.
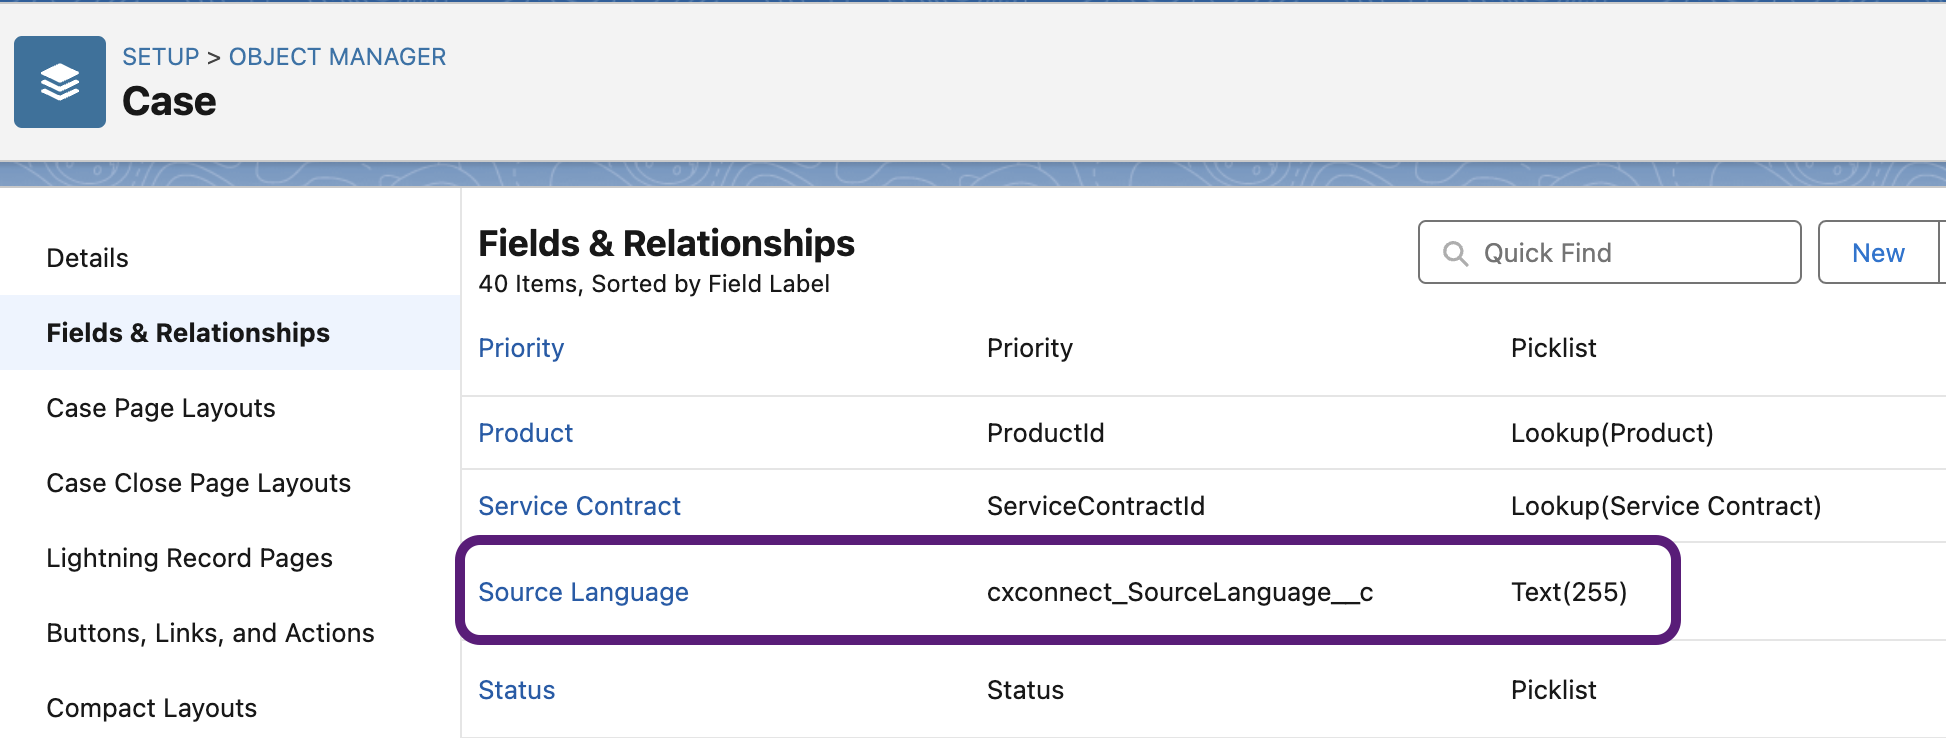
 3. After enabling translation for a Salesforce object, a new field called "Source Language" will be added to that object. To allow all user profiles to access the cxconnect.ai translation service, update the field level security settings.
**NOTE:** This field defaults access to System Administrators only.
3. After enabling translation for a Salesforce object, a new field called "Source Language" will be added to that object. To allow all user profiles to access the cxconnect.ai translation service, update the field level security settings.
**NOTE:** This field defaults access to System Administrators only.
 ## *Step 7: Configure Translation Rules*
1. Select the Translation Rules Tab.
## *Step 7: Configure Translation Rules*
1. Select the Translation Rules Tab. * Below is the guidance for each field regarding Translation Rules:
* **Object**: This is the object you wish to set up the translation rule for. Currently, each object can only be selected once.
* **Fields to Translate**: Source fields you wish to have translated.
* **Target Languages**: The default Agent language(s) you'd like the selected fields automatically translated into.
**WARNING:** Selecting too many default Target Languages will incur significant costs.
* Add Translation Rules to each object you wish to translate by clicking the “Add Row” button
* You can filter translation rules by clicking on the filter icon in the right corner of the Translation Rule page. Then select the appropriate filter criteria and click “Apply” to see refined results.
##
## *Step 8: Configure Translation Field Rules*
If you would prefer to have individual fields populated with translations, Translation Field Rules provide that functionality.
1. Select the Translation Field Rules tab
* Below is the guidance for each field regarding Translation Rules:
* **Object**: This is the object you wish to set up the translation rule for. Currently, each object can only be selected once.
* **Fields to Translate**: Source fields you wish to have translated.
* **Target Languages**: The default Agent language(s) you'd like the selected fields automatically translated into.
**WARNING:** Selecting too many default Target Languages will incur significant costs.
* Add Translation Rules to each object you wish to translate by clicking the “Add Row” button
* You can filter translation rules by clicking on the filter icon in the right corner of the Translation Rule page. Then select the appropriate filter criteria and click “Apply” to see refined results.
##
## *Step 8: Configure Translation Field Rules*
If you would prefer to have individual fields populated with translations, Translation Field Rules provide that functionality.
1. Select the Translation Field Rules tab
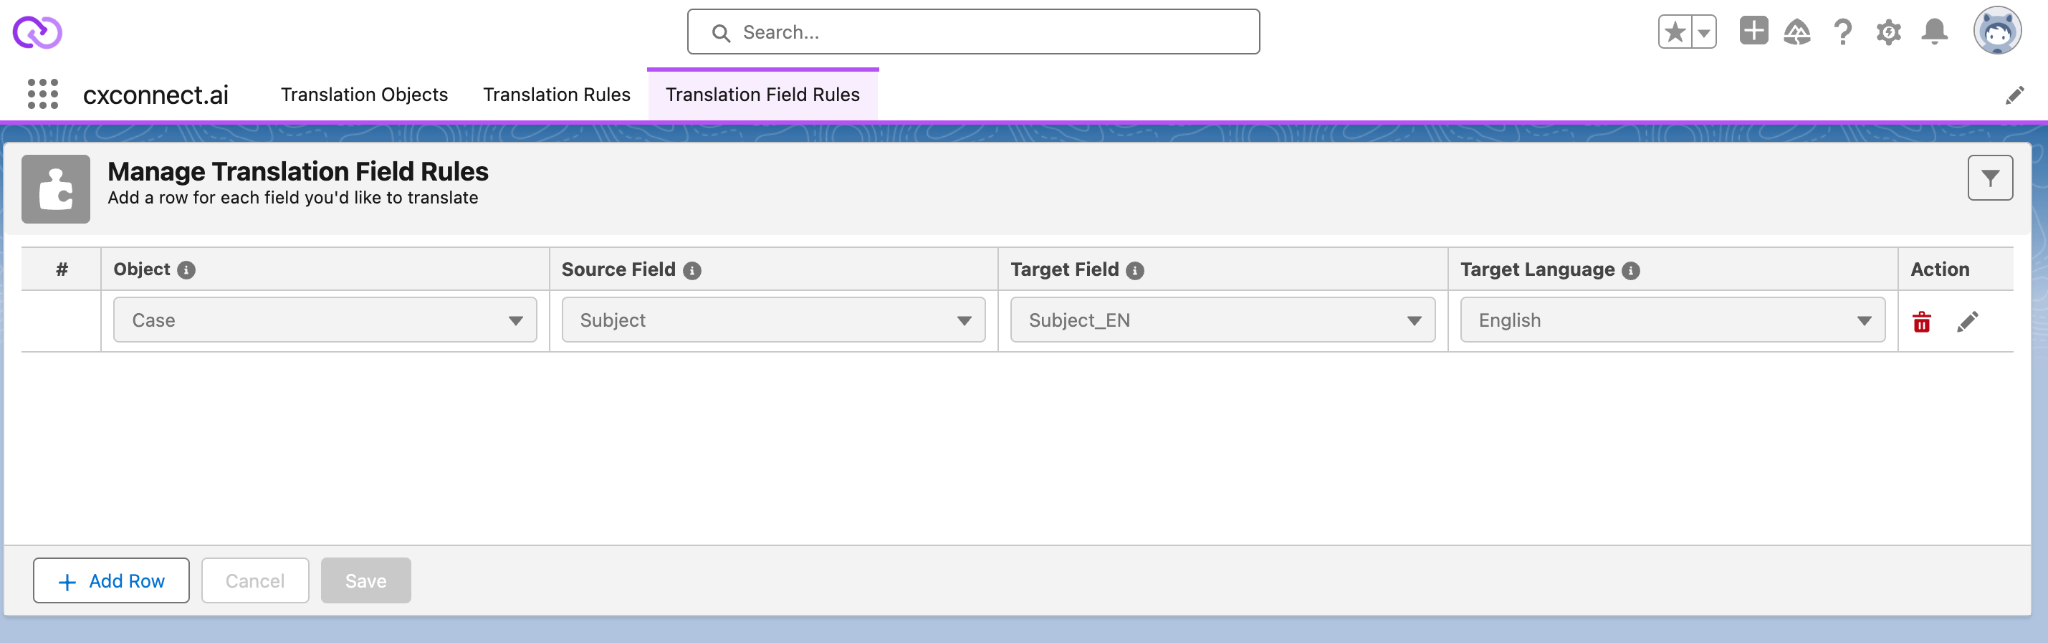 * Below is the guidance for each field regarding Translation Field Rules:
* **Object**: This is the object you wish to set up the translation rule for. Currently, each object can only be selected once.
* **Source Field**: Source field you wish to have translated. This can either be a standard or custom field.
* **Target Field**: The target field to save the translation into. This can either be a standard or custom field.
* **Target Languages**: Languages you'd like the selected fields translated into.
* Add Translation Field Rules to each field you wish to translate by clicking the “Add Row” button
* You can filter translation rules by clicking on the filter icon in the right corner of the Translation Field Rule page. Then select the appropriate filter criteria and click “Apply” to see refined results.
For these fields to populate with translated data a custom flow MUST be set up. cxconnect.ai provides a template that can be activated to run when a case is created.
* Below is the guidance for each field regarding Translation Field Rules:
* **Object**: This is the object you wish to set up the translation rule for. Currently, each object can only be selected once.
* **Source Field**: Source field you wish to have translated. This can either be a standard or custom field.
* **Target Field**: The target field to save the translation into. This can either be a standard or custom field.
* **Target Languages**: Languages you'd like the selected fields translated into.
* Add Translation Field Rules to each field you wish to translate by clicking the “Add Row” button
* You can filter translation rules by clicking on the filter icon in the right corner of the Translation Field Rule page. Then select the appropriate filter criteria and click “Apply” to see refined results.
For these fields to populate with translated data a custom flow MUST be set up. cxconnect.ai provides a template that can be activated to run when a case is created.
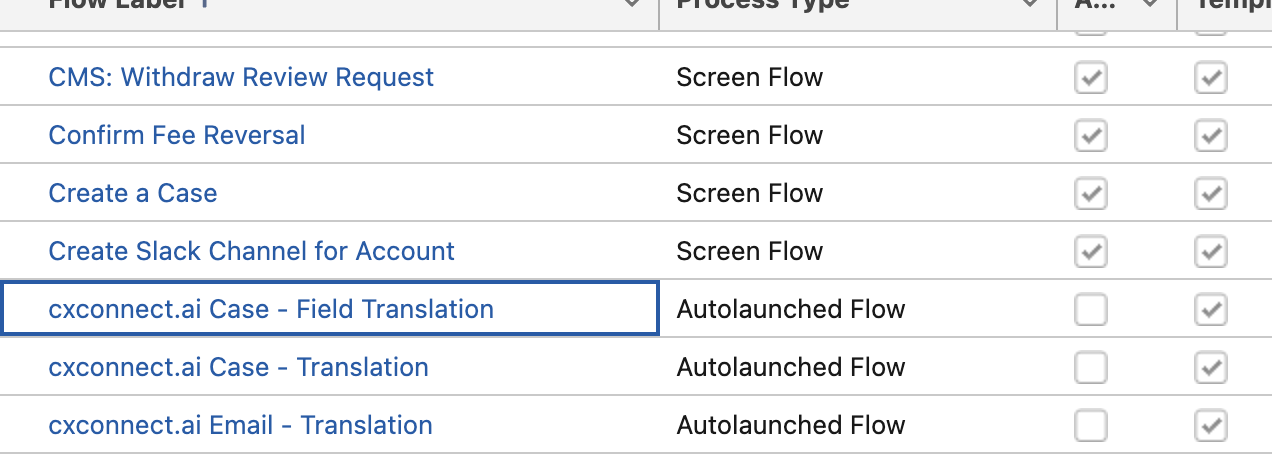 * Navigate to Setup > Flows
* From the *cxconnect.ai Case - Field Translation* option select “View Details and Versions”
* Navigate to Setup > Flows
* From the *cxconnect.ai Case - Field Translation* option select “View Details and Versions”
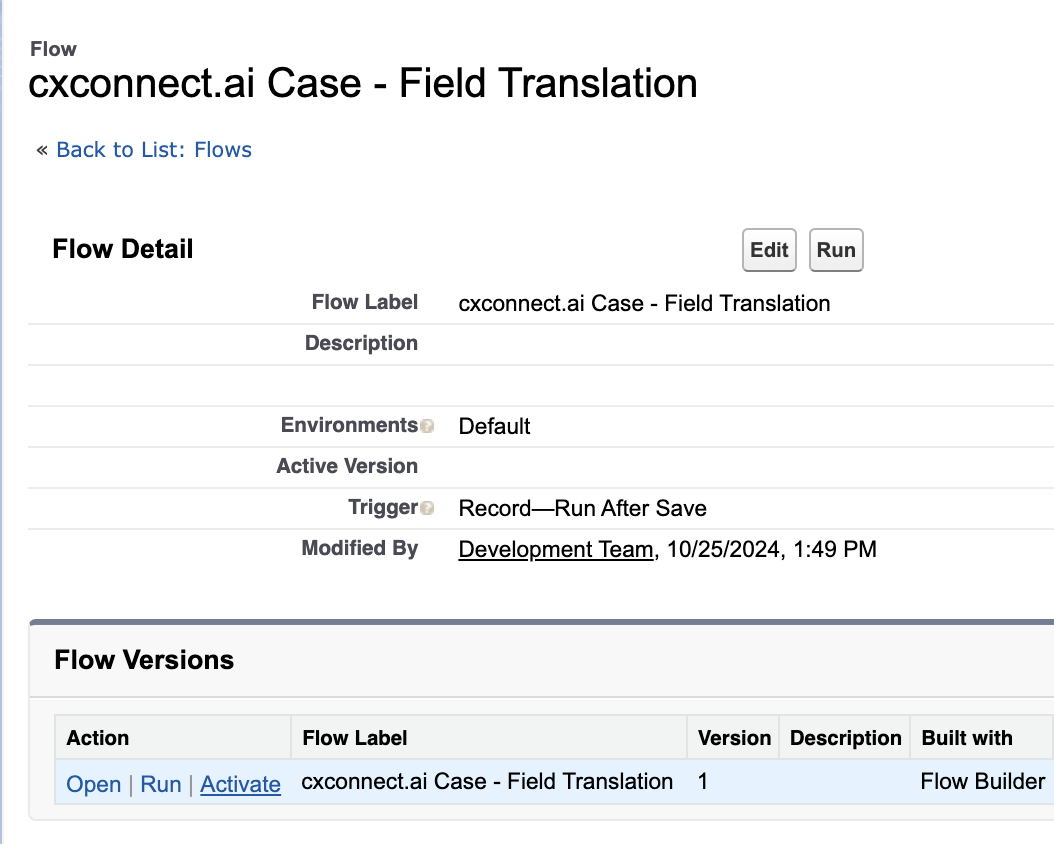 * Select “Activate”
* Now when a Case is created translations will asynchronously populate the fields selected in the Translation Field Rules tab.
## *Step 9 RECOMMENDED: Automatically Translate Records*
Historically, cxconnect.ai relied on custom flows to translate Case records. This process, while effective, was subject to latency and additional administrative overhead.
Starting in v3.1 cxconnect.ai has opted to bypass working within Flows to prefer translating records when an agent loads a Case for the first time.
A custom metadata field is now available to allow this translation to run immediately when a record is opened or manually with a button click.
* Select “Activate”
* Now when a Case is created translations will asynchronously populate the fields selected in the Translation Field Rules tab.
## *Step 9 RECOMMENDED: Automatically Translate Records*
Historically, cxconnect.ai relied on custom flows to translate Case records. This process, while effective, was subject to latency and additional administrative overhead.
Starting in v3.1 cxconnect.ai has opted to bypass working within Flows to prefer translating records when an agent loads a Case for the first time.
A custom metadata field is now available to allow this translation to run immediately when a record is opened or manually with a button click.
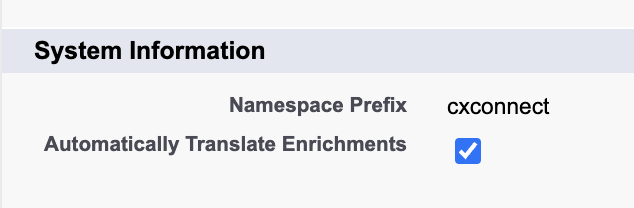 This option is defaulted to True.
If a record does not already have a translation in an agent’s language the record is translated (based on configurations setup in step 7) right when the agent loads the record.
## *Step 10 OPTIONAL: Automatically Approve Emails*
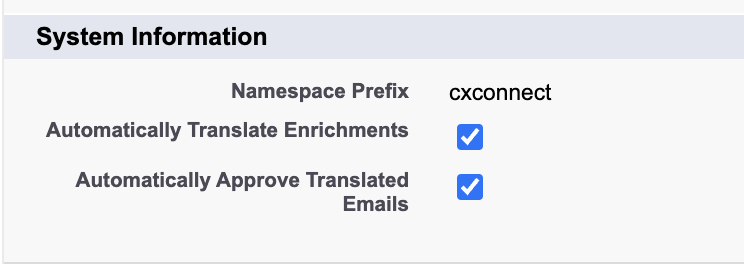
Starting in v3.9 cxconnect.ai added a feature to allow the automatic approval of email translations. Enabling this option within the Custom Metadata (see [step 3](#step-3:-configure-translation-setting,-authentication-key-and-api-endpoint) for reference) will bypass the email preview and simply replace the current drafted email with the translation. This will **not** automatically send the email.\\
This option is defaulted to True.
If a record does not already have a translation in an agent’s language the record is translated (based on configurations setup in step 7) right when the agent loads the record.
## *Step 10 OPTIONAL: Automatically Approve Emails*
Starting in v3.9 cxconnect.ai added a feature to allow the automatic approval of email translations. Enabling this option within the Custom Metadata (see [step 3](#step-3:-configure-translation-setting,-authentication-key-and-api-endpoint) for reference) will bypass the email preview and simply replace the current drafted email with the translation. This will **not** automatically send the email.\\
 ## *Step 11 OPTIONAL: Turn off Email Trigger*
Starting in v3.15 cxconnect.ai added a feature to allow the turning off of the automatic email trigger.
Disabling this option within the Custom Metadata (see [step 3](#step-3%3A-configure-translation-settings) for reference) will turn off the custom email trigger.
This will prevent cxconnect.ai email triggers from firing which is helpful for client that send bulk emails.\
Having this option un-checked will remove the automatic refresh of the email translation component when an email is sent.
## *Step 11 OPTIONAL: Turn off Email Trigger*
Starting in v3.15 cxconnect.ai added a feature to allow the turning off of the automatic email trigger.
Disabling this option within the Custom Metadata (see [step 3](#step-3%3A-configure-translation-settings) for reference) will turn off the custom email trigger.
This will prevent cxconnect.ai email triggers from firing which is helpful for client that send bulk emails.\
Having this option un-checked will remove the automatic refresh of the email translation component when an email is sent.
 ## *Step 12 OPTIONAL: Create Flow to Translate Records in “Real-time”*
Create a flow for each object that is enabled in the “Manage Translation” tab.
1. Setup a flow for each object you have enabled translation for by navigating to setup and then search for “Flows” in the search bar.
## *Step 12 OPTIONAL: Create Flow to Translate Records in “Real-time”*
Create a flow for each object that is enabled in the “Manage Translation” tab.
1. Setup a flow for each object you have enabled translation for by navigating to setup and then search for “Flows” in the search bar. 2. Select “cxconnect.ai Case - Translation” in the list of flows.
1. This is a flow template which can be cloned to support any Salesforce objects.
2. Select “cxconnect.ai Case - Translation” in the list of flows.
1. This is a flow template which can be cloned to support any Salesforce objects.
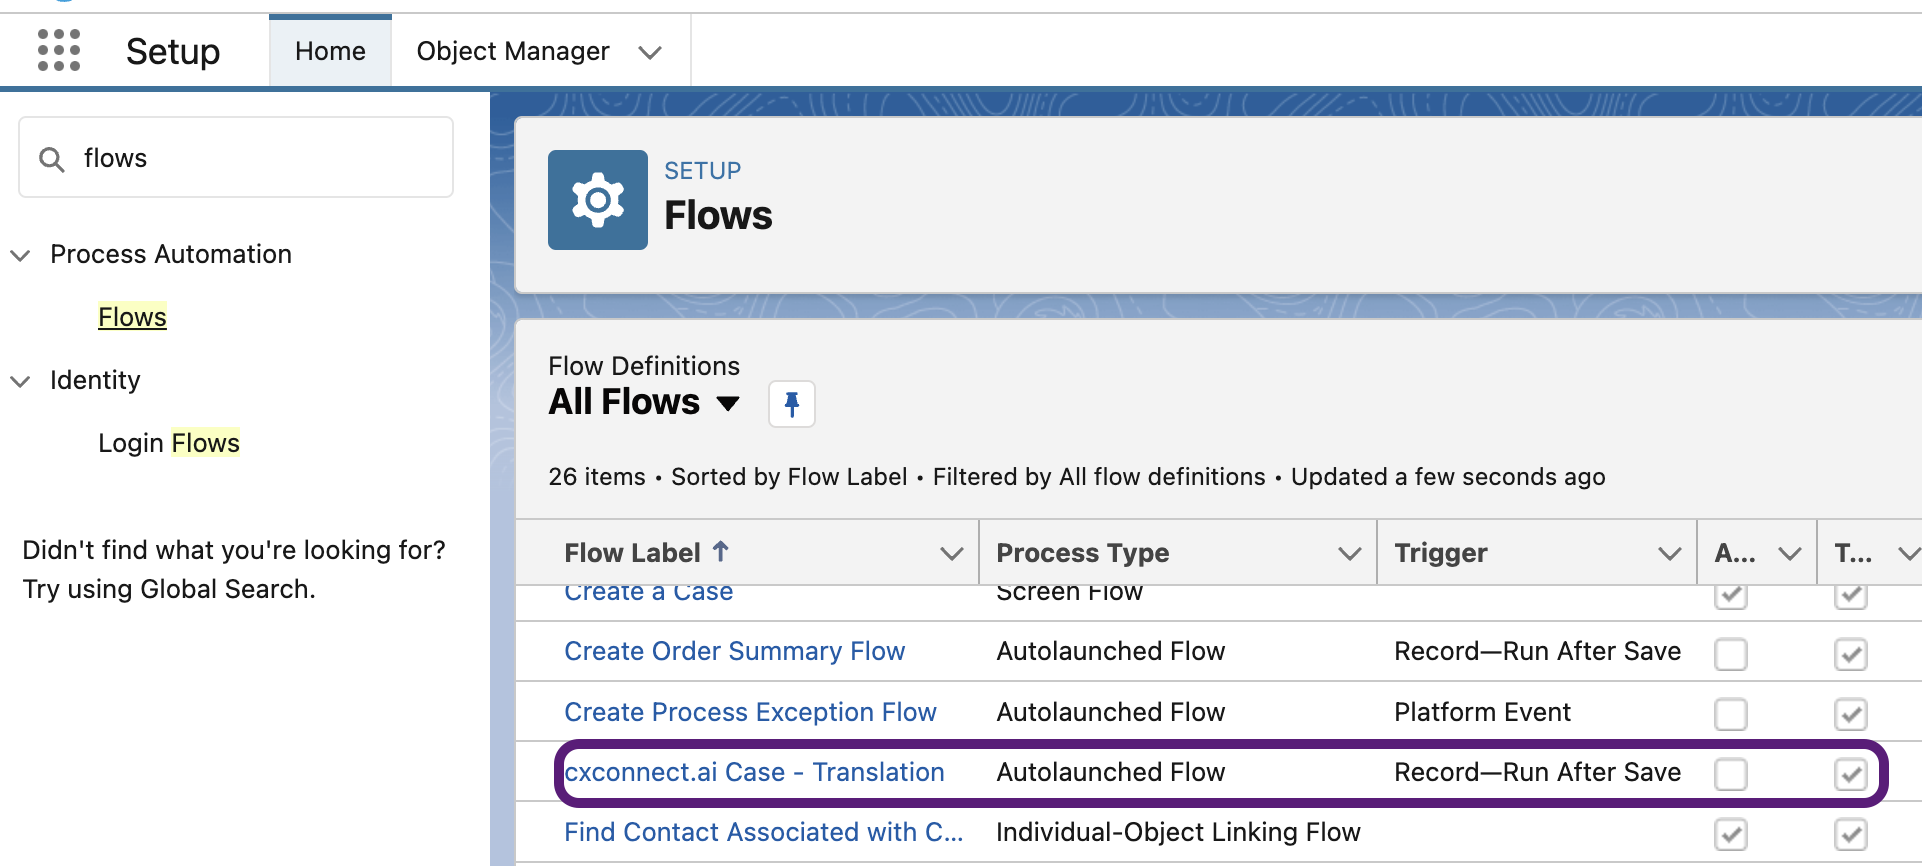 3. Click “Save As” and provide “Flow Label” and “Flow API Name” and save new flow.
1. Case - Translation (On Create)
1. To translate on creation setup trigger criteria as “A record is created”
3. Click “Save As” and provide “Flow Label” and “Flow API Name” and save new flow.
1. Case - Translation (On Create)
1. To translate on creation setup trigger criteria as “A record is created”
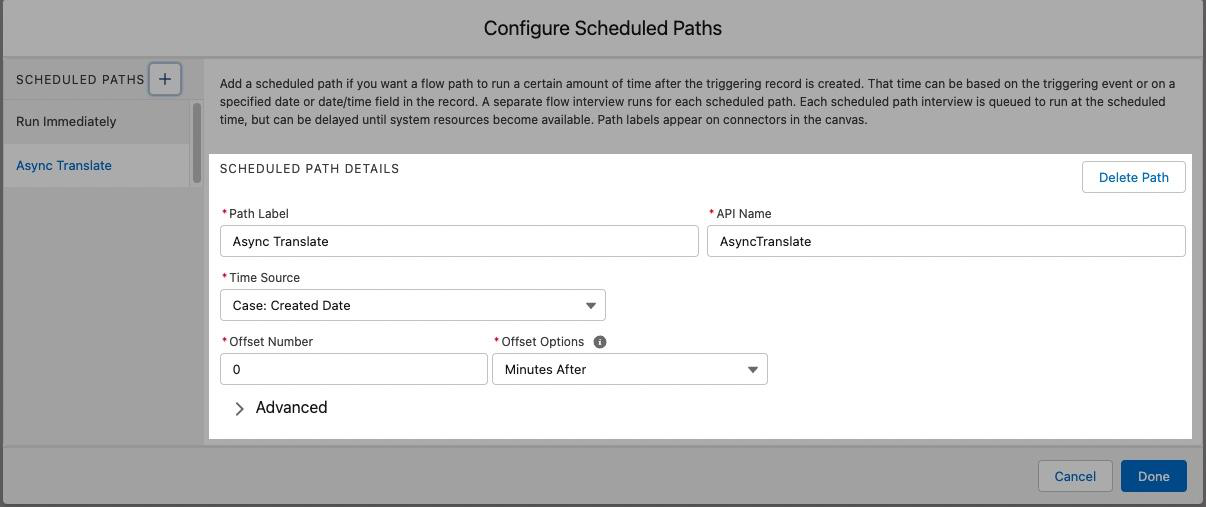
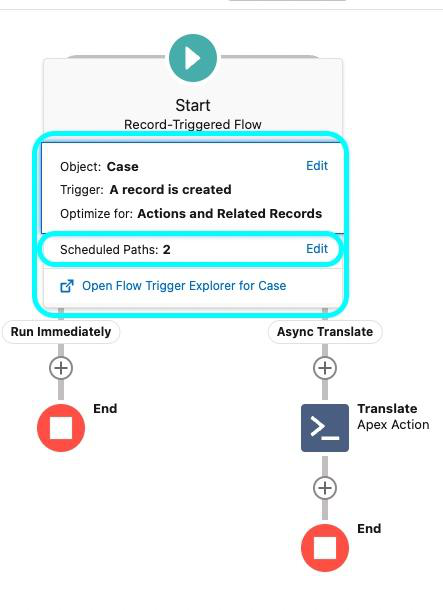 2. Configure scheduled path as shown below
 3. Save & Activate
#
# Base App Capabilities
## *Interpreter*
By adding the out-of-the-box cxconnect.ai component onto any flexi record page, cxconnect.ai Interpreter enables users to translate text in real time on any flexi page.
Use cases making this feature valuable may include updating existing localized transcripts or editing any localized predictive texts in the local language. This feature can also be helpful to help with ad hoc translation needs outside the agent workflow.
To add the cxconnect.ai Interpreter, follow the steps below.
1. Open any record page in Lightning
2. Click on the gear icon in the top right corner of the screen and select Edit Page.
3. From the App builder, drag and drop the “**Translation : Adhoc**” component to the flexi page layout.
3. Save & Activate
#
# Base App Capabilities
## *Interpreter*
By adding the out-of-the-box cxconnect.ai component onto any flexi record page, cxconnect.ai Interpreter enables users to translate text in real time on any flexi page.
Use cases making this feature valuable may include updating existing localized transcripts or editing any localized predictive texts in the local language. This feature can also be helpful to help with ad hoc translation needs outside the agent workflow.
To add the cxconnect.ai Interpreter, follow the steps below.
1. Open any record page in Lightning
2. Click on the gear icon in the top right corner of the screen and select Edit Page.
3. From the App builder, drag and drop the “**Translation : Adhoc**” component to the flexi page layout.
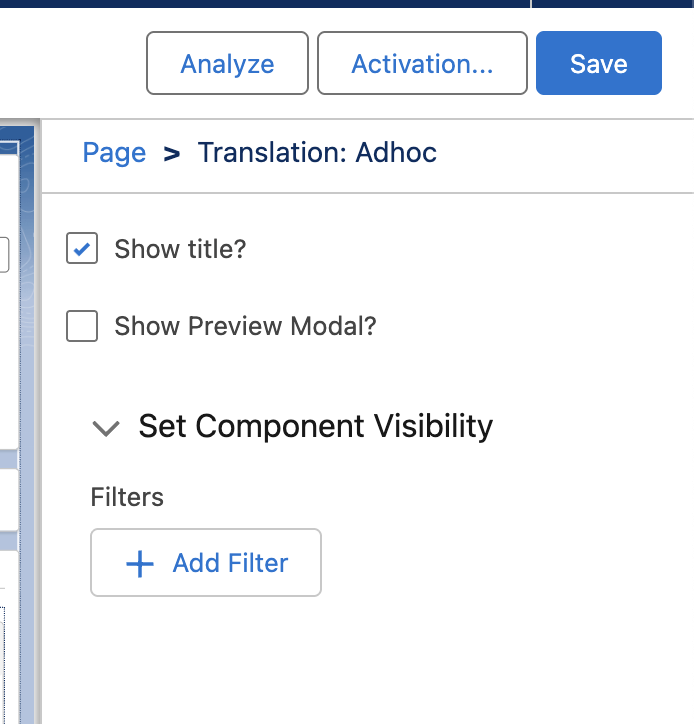
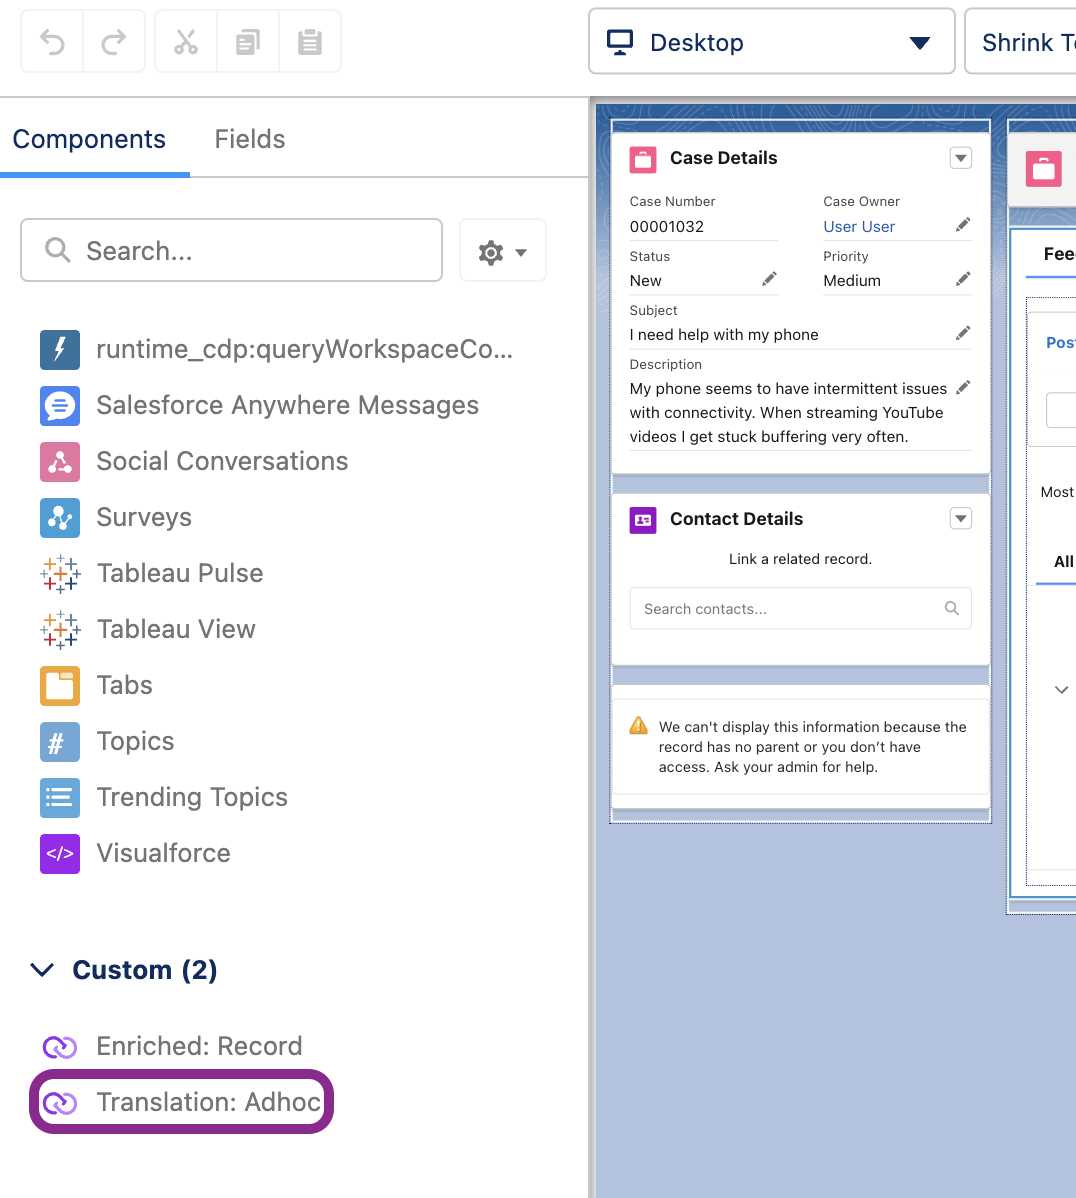 4. The following page options are available:
* Show Preview Modal which shows or hides translation preview.
* Hide Title which hides the Interpreter title from user view.
4. The following page options are available:
* Show Preview Modal which shows or hides translation preview.
* Hide Title which hides the Interpreter title from user view.
 5. Save
After saving the component, the cxconnect.ai Interpreter is ready for translation.
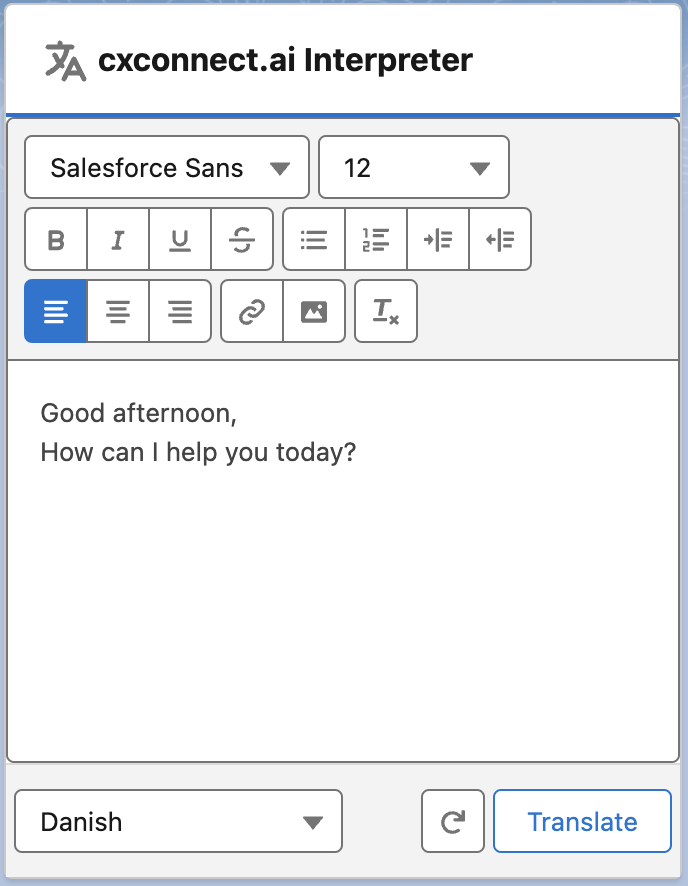
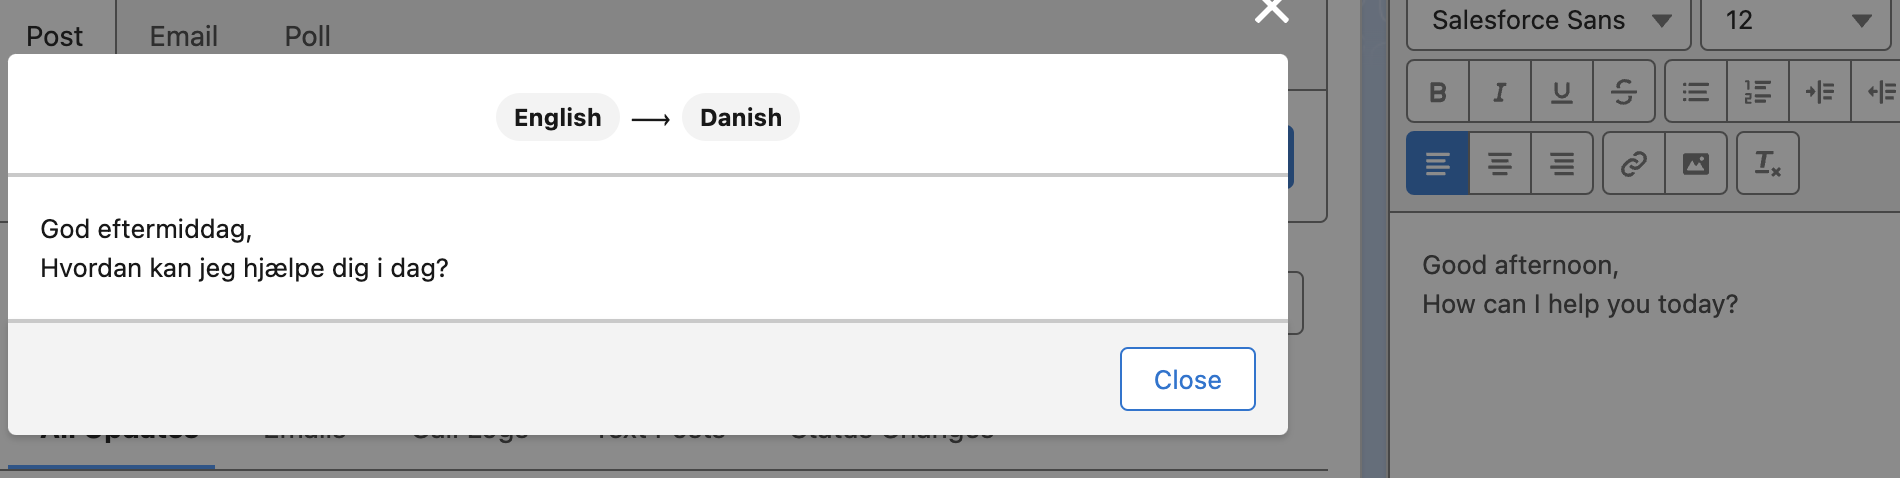
To translate your text, enter it and choose the desired target language, then click the "Translate" button. The translated text will appear in a popup window along with the identified source language.
5. Save
After saving the component, the cxconnect.ai Interpreter is ready for translation.
To translate your text, enter it and choose the desired target language, then click the "Translate" button. The translated text will appear in a popup window along with the identified source language.
 ## *Enriched Record*
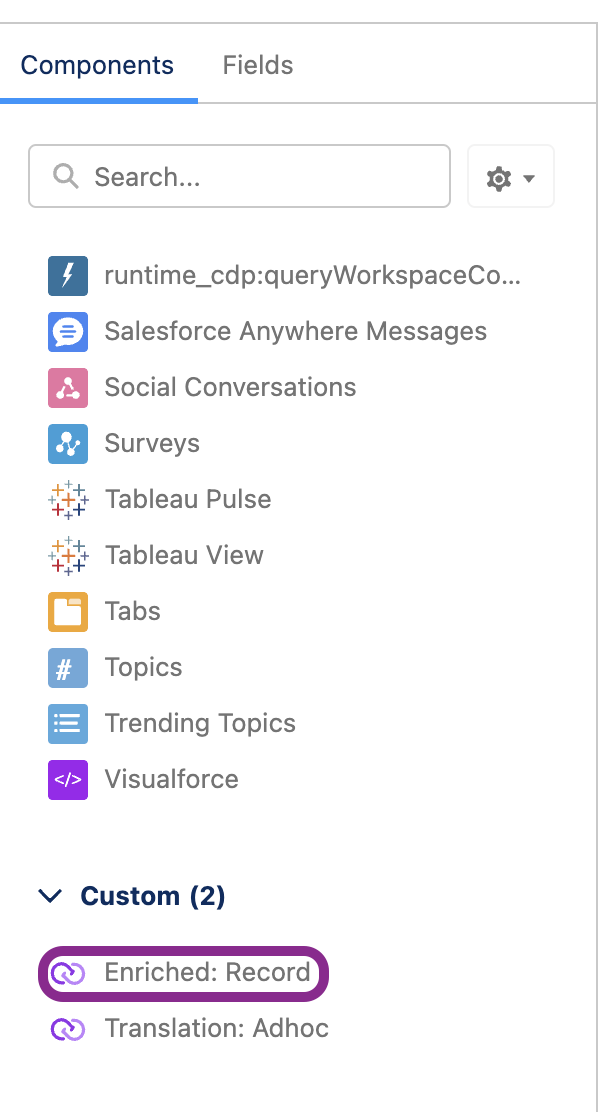
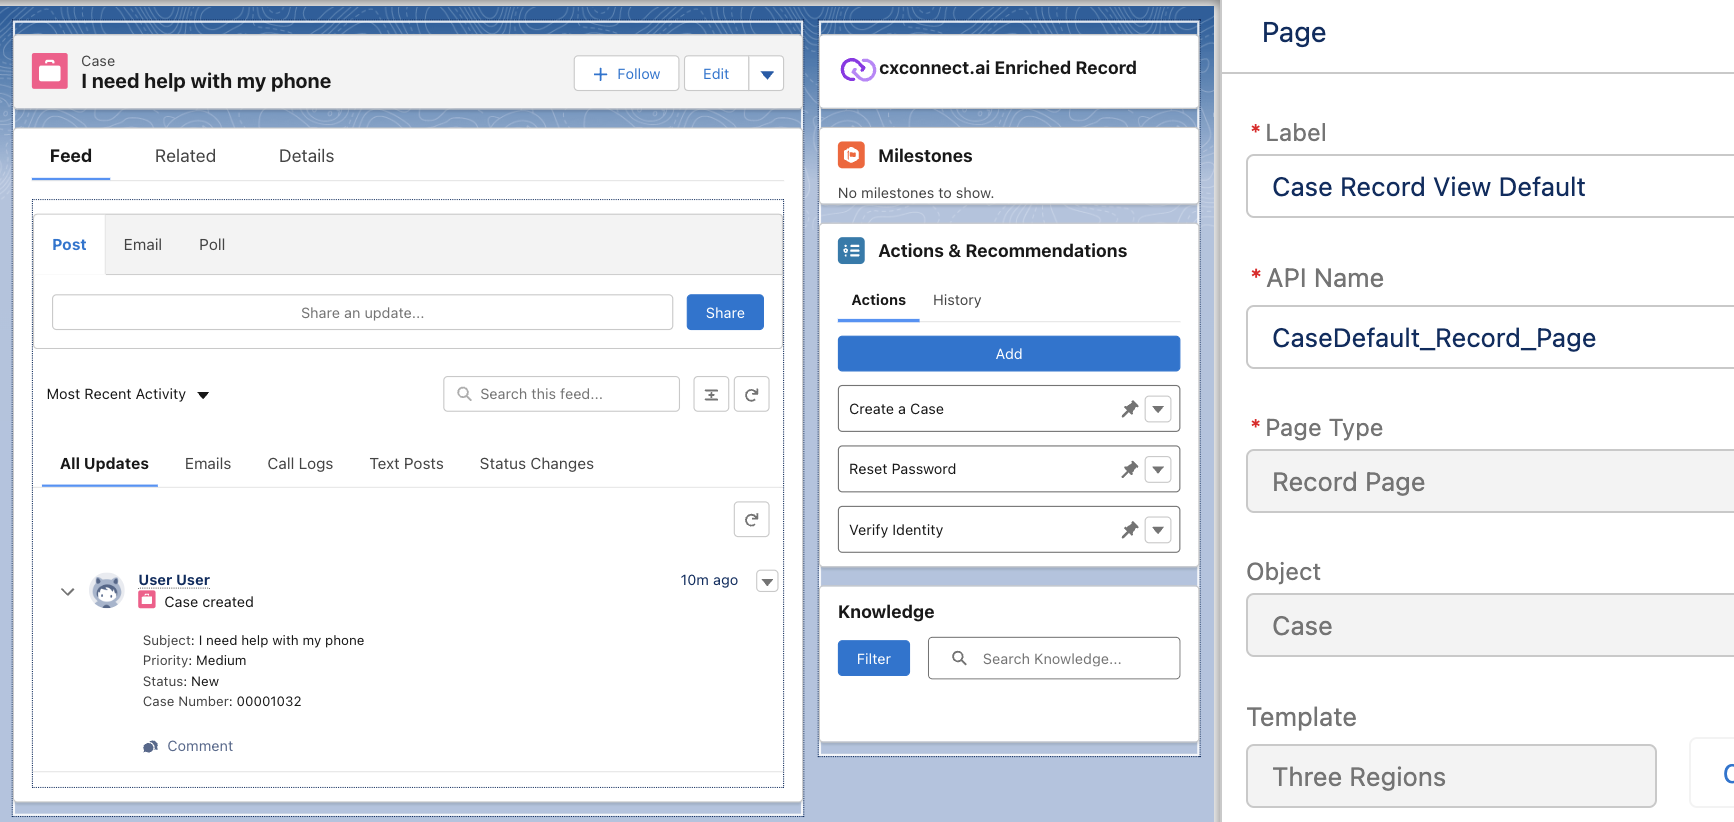
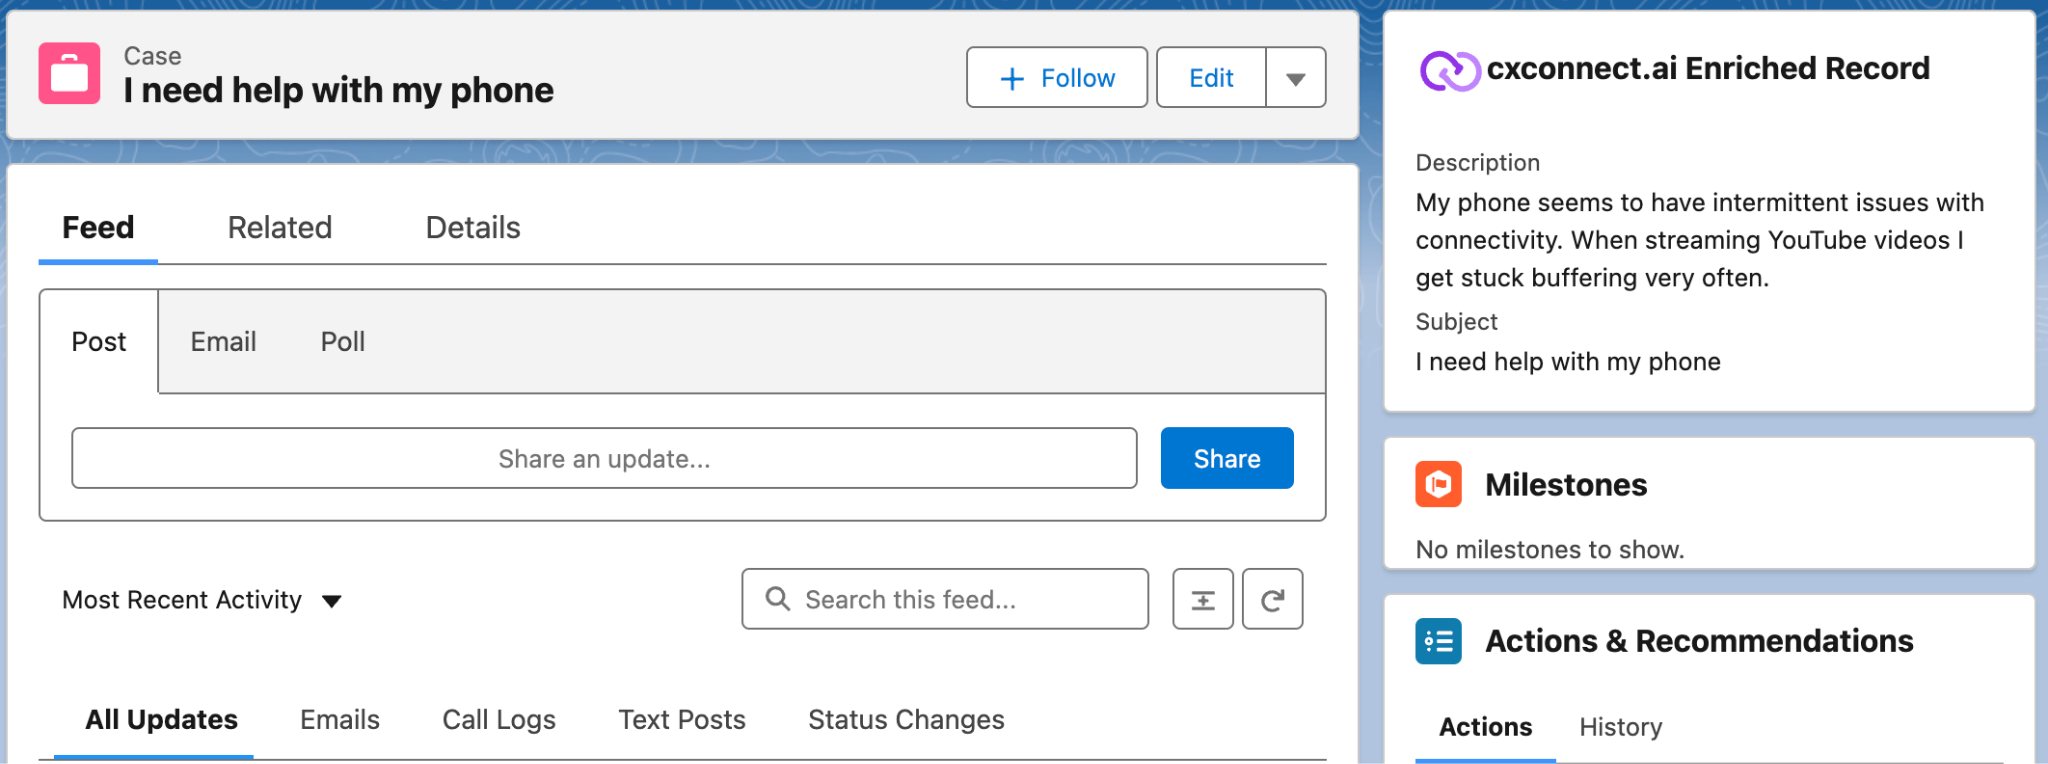
The cxconnect.ai Base application deploys with a custom component that can be added to any record page that is associated with a [translation rule](#step-7:-configure-translation-rules). Adding the **Enriched: Record** component to the Case record page allows Translations and other enrichments to be displayed.
## *Enriched Record*
The cxconnect.ai Base application deploys with a custom component that can be added to any record page that is associated with a [translation rule](#step-7:-configure-translation-rules). Adding the **Enriched: Record** component to the Case record page allows Translations and other enrichments to be displayed.
 The component displays the translated information in the Users local language. For example: If an English case is created and the pre-configured Translation Rule is set up to translate into English and French, an English speaking user would see the following.
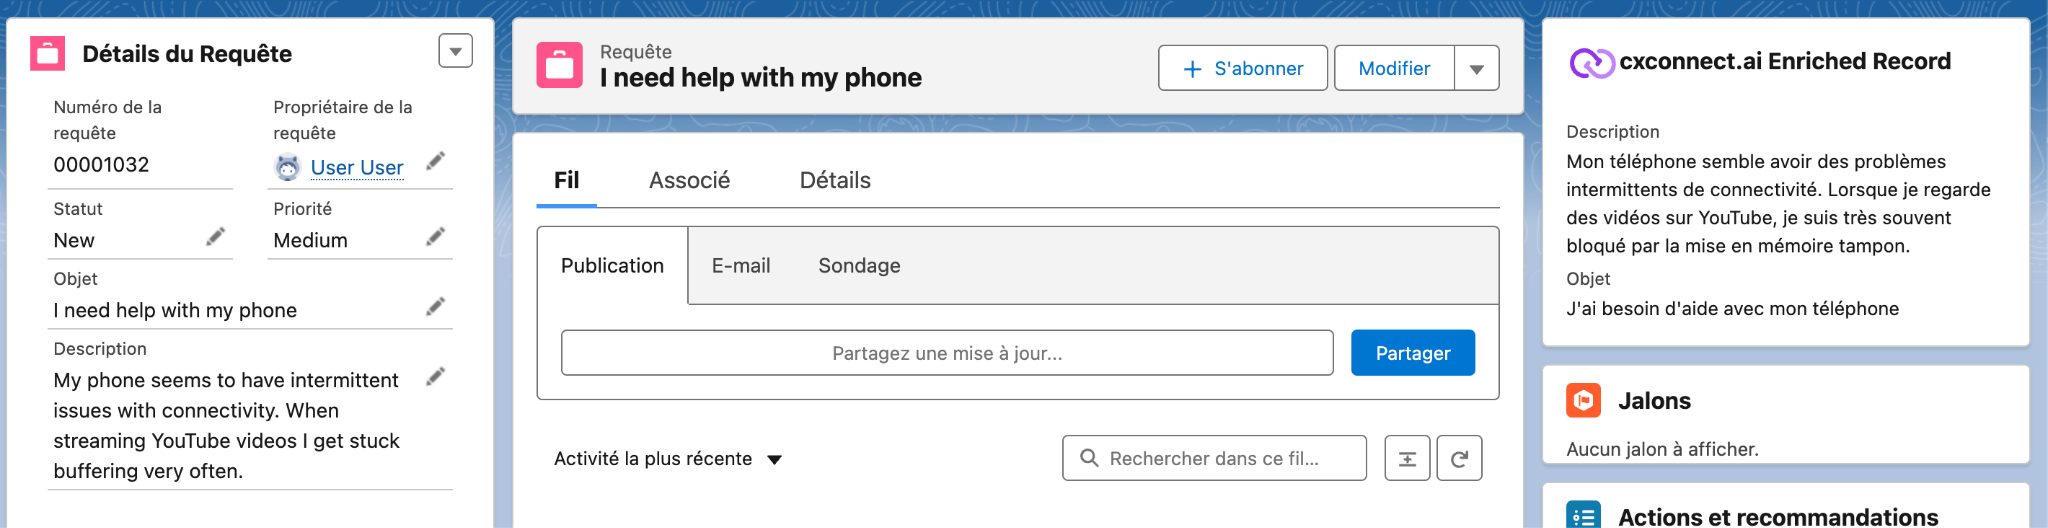
 The French speaking User would see the same information in French.
 ## *Email Translator*
### Add Email Translator Component
To add the cxconnect.ai Email Translator to your Case Lightning Record Page here are the steps to take:
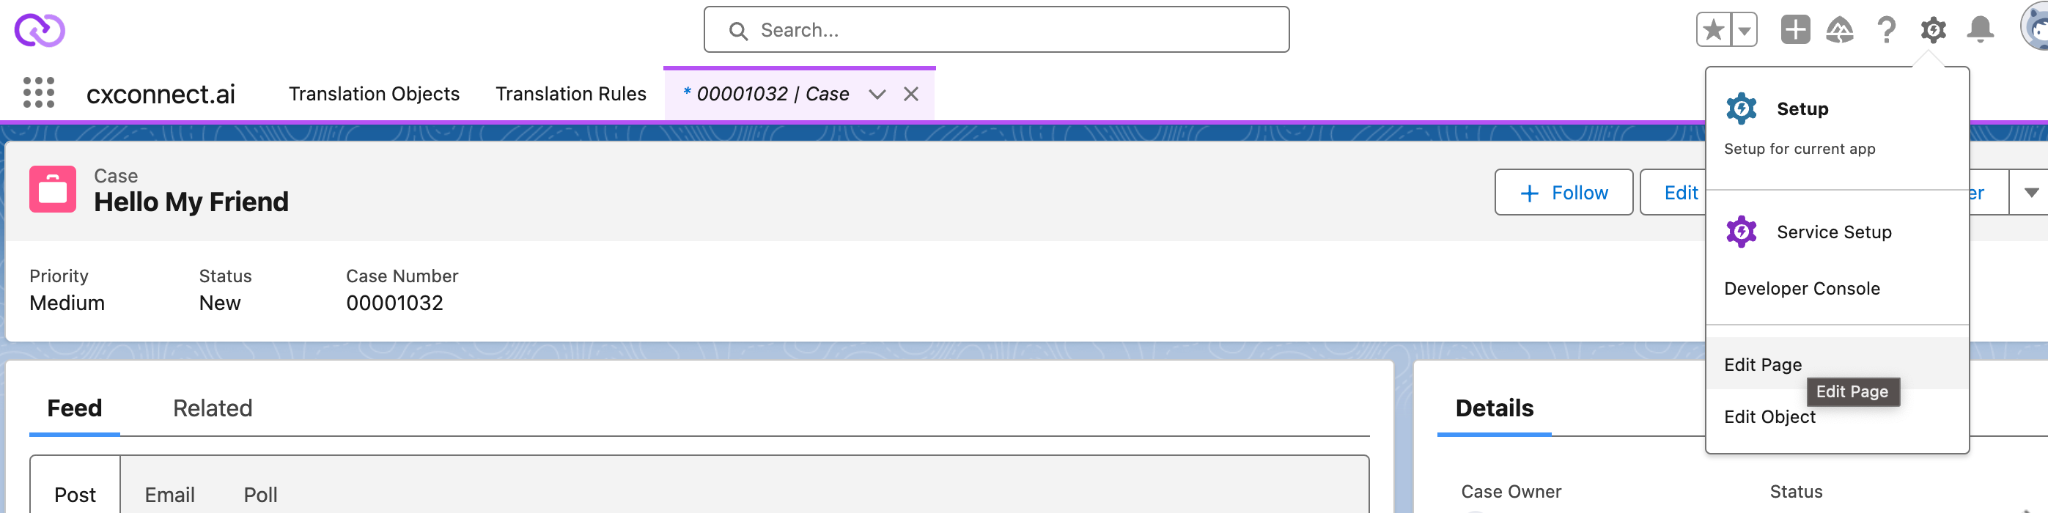
1. Open the Record Page of the Case object to use this email component and click on Edit Page on the top setting widget
## *Email Translator*
### Add Email Translator Component
To add the cxconnect.ai Email Translator to your Case Lightning Record Page here are the steps to take:
1. Open the Record Page of the Case object to use this email component and click on Edit Page on the top setting widget
 2. Select the custom Email Translator component and drop it in a convenient location.
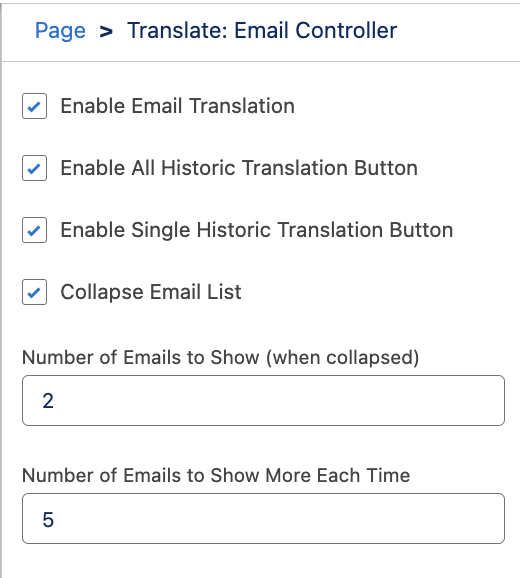
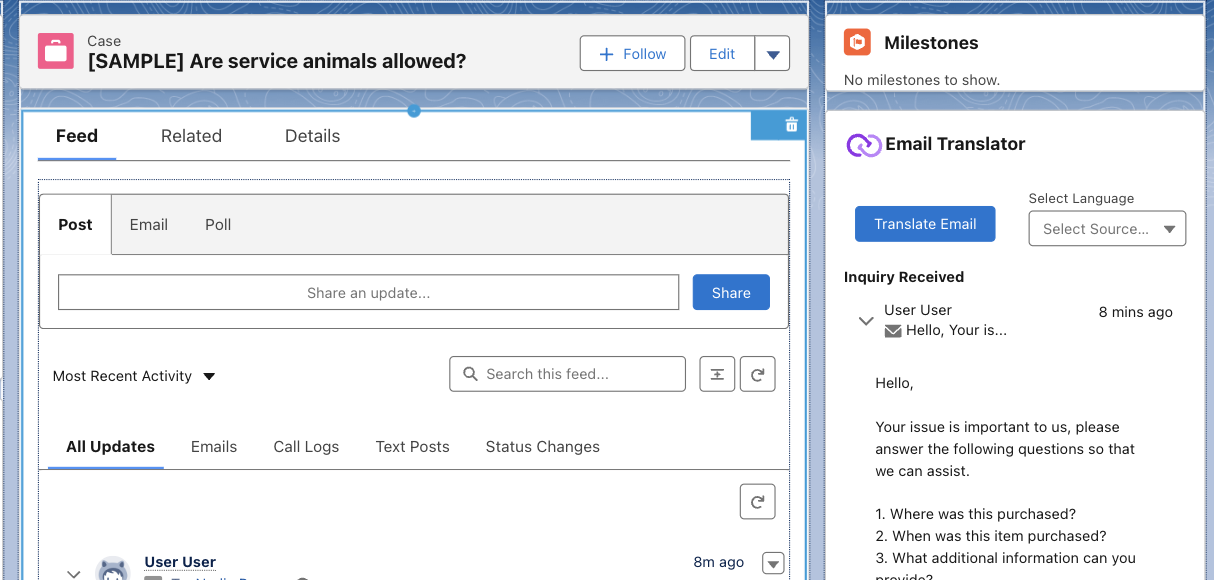 3. The component has page options that adjust how the component looks to users.
* Enable Email Translation: enables or disables the "Translate Email" button and language dropdown
* Enable All Historic Translation Button: enables or disables this button, which will translate all previous untranslated emails in an email chain
* Enable Single Historic Translation Button: enables or disables this button, which allows a user to translate a single untranslated email into their language
* Collapse Email List: Sets the ability to collapse and display only a subset of emails
* Number of Emails to Show: Sets the number of emails that are shown by default before collapsing emails
* Number of Emails to Show More Each Time: Set the number of additional emails that are revealed when the "Show More" is clicked
3. The component has page options that adjust how the component looks to users.
* Enable Email Translation: enables or disables the "Translate Email" button and language dropdown
* Enable All Historic Translation Button: enables or disables this button, which will translate all previous untranslated emails in an email chain
* Enable Single Historic Translation Button: enables or disables this button, which allows a user to translate a single untranslated email into their language
* Collapse Email List: Sets the ability to collapse and display only a subset of emails
* Number of Emails to Show: Sets the number of emails that are shown by default before collapsing emails
* Number of Emails to Show More Each Time: Set the number of additional emails that are revealed when the "Show More" is clicked
 3. Click save and activate the page
### Required: Activate the Inbound Translation Flow
To assure your inbound emails are translated correctly a custom flow installs with the package that will translate emails as the flow in.
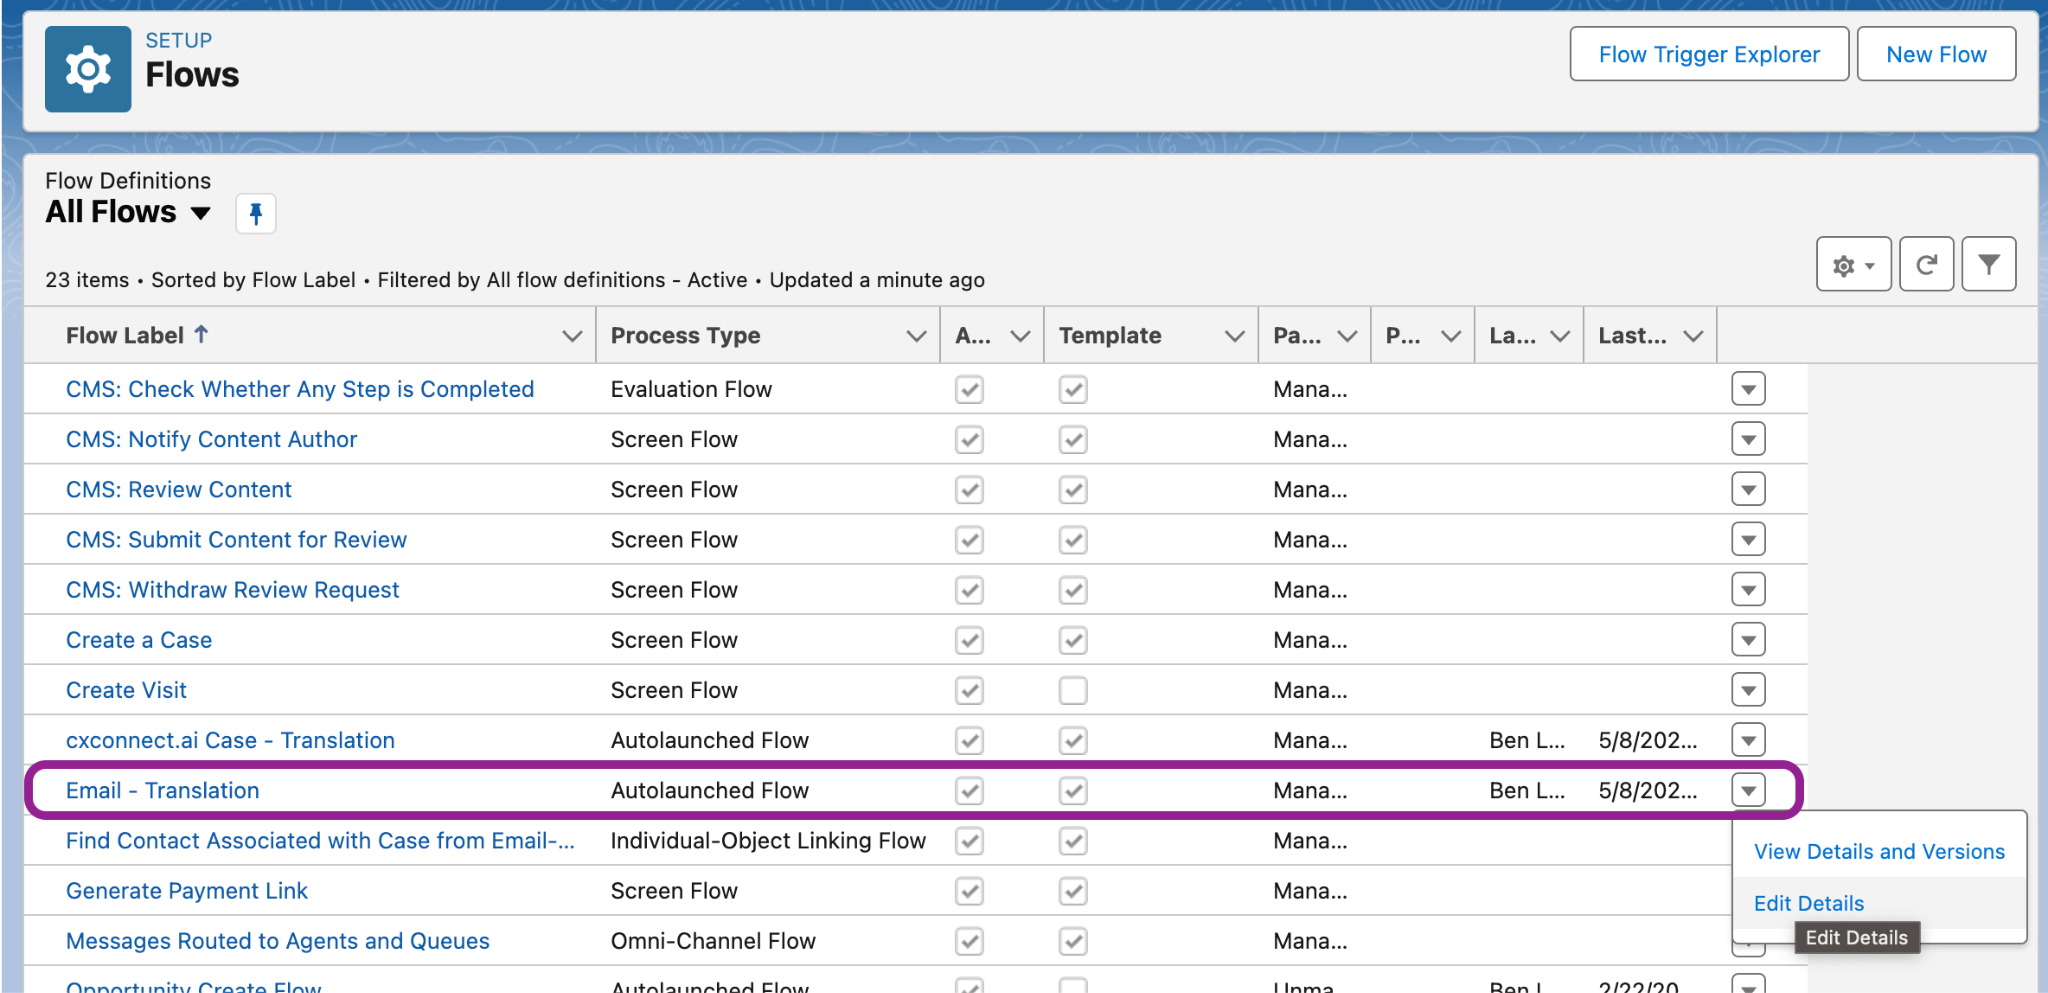
Navigate to Setup -> Flows
Find and click the **Email - Translation** Flow to view and activate.
3. Click save and activate the page
### Required: Activate the Inbound Translation Flow
To assure your inbound emails are translated correctly a custom flow installs with the package that will translate emails as the flow in.
Navigate to Setup -> Flows
Find and click the **Email - Translation** Flow to view and activate.
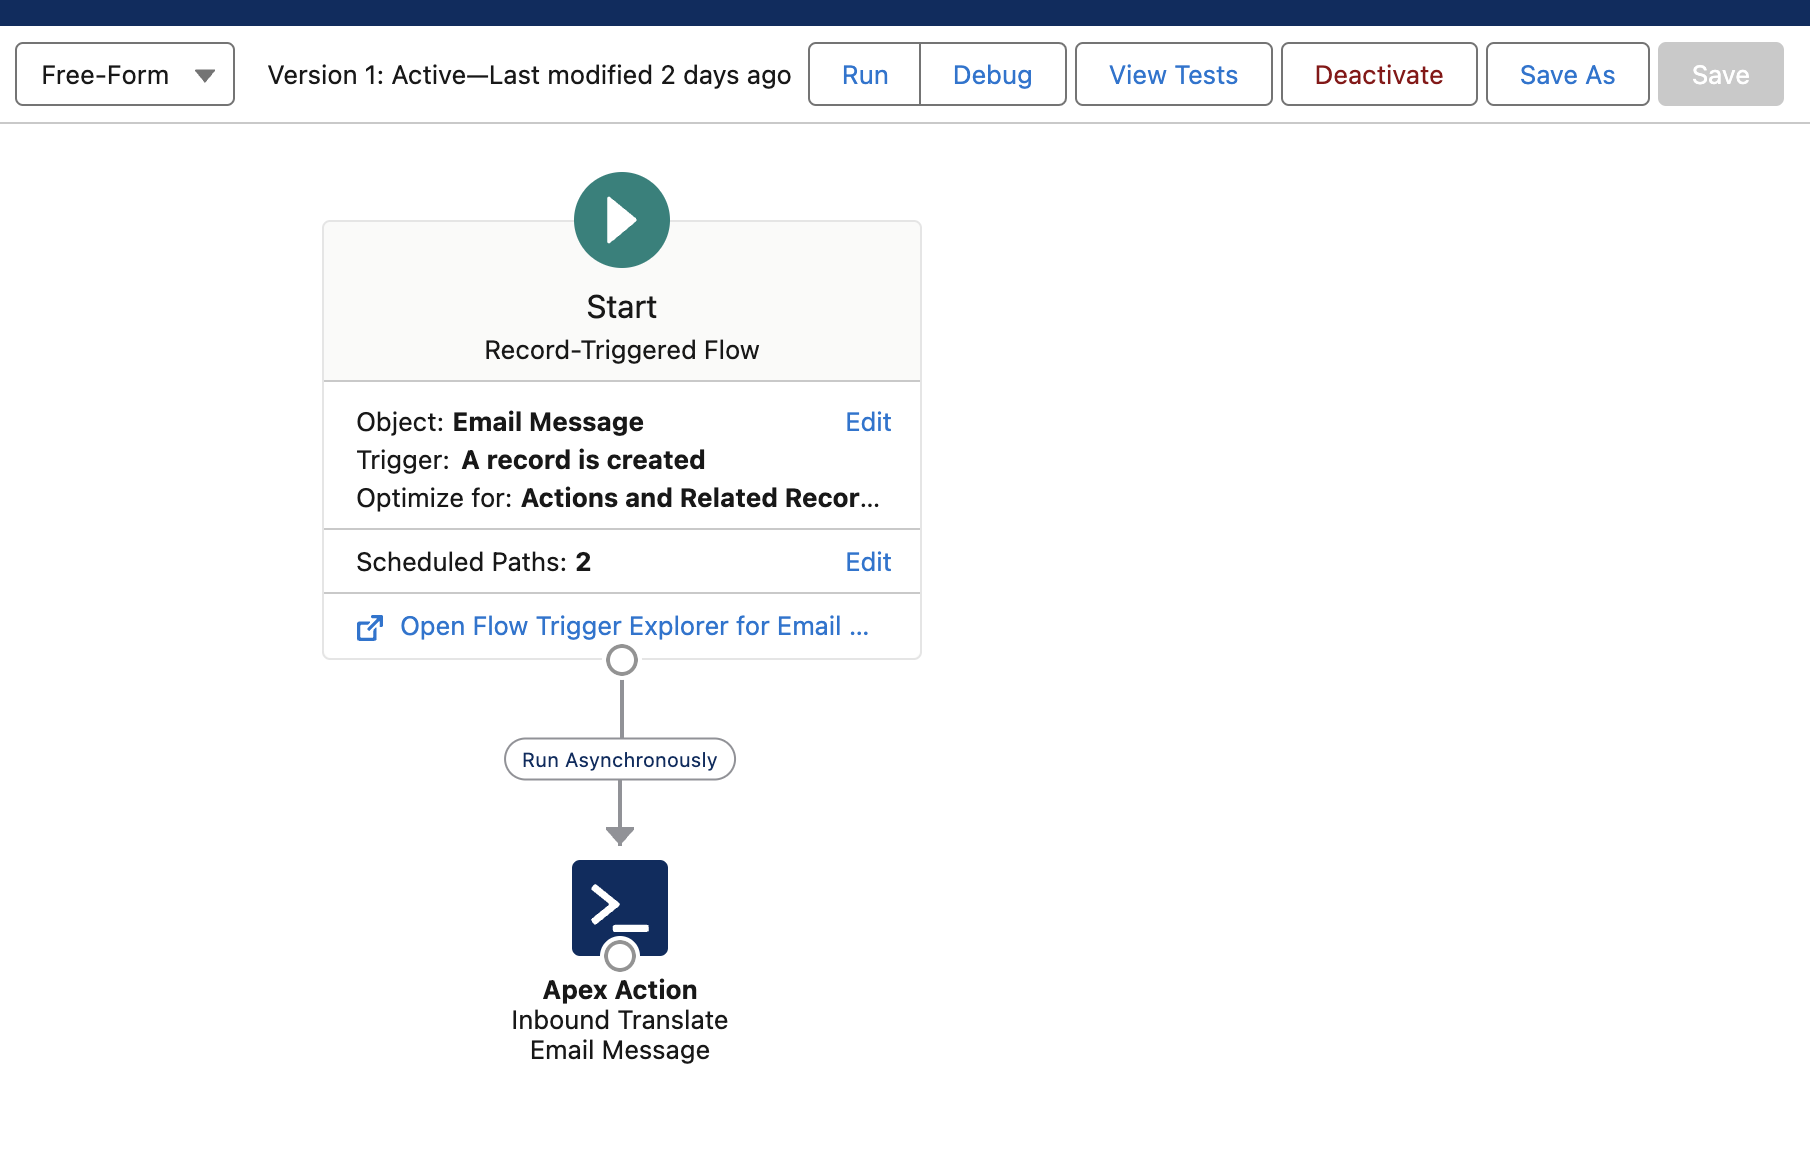
 Within the Flow Builder screen **Activate** and **Save**
 ### Required: Activate Email Settings
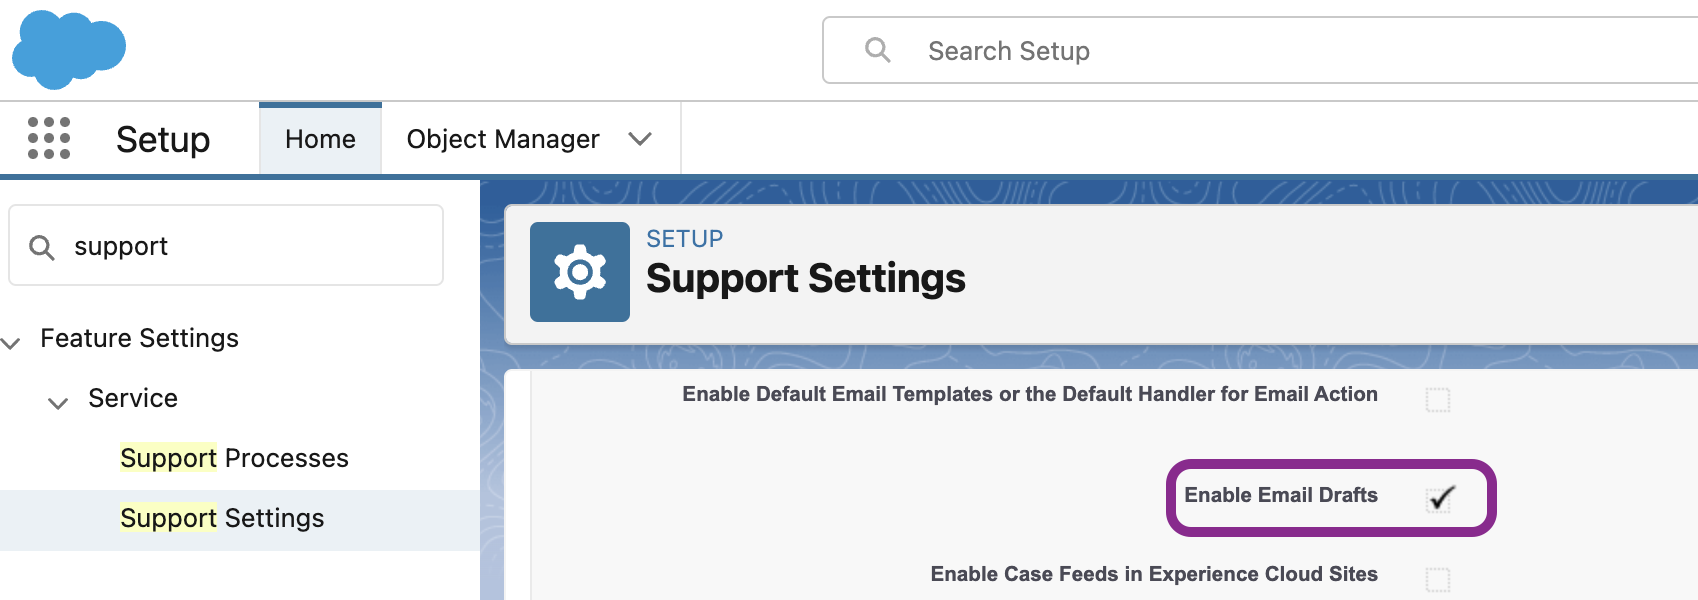
It’s required to Enable Email Drafts if not already enabled contained in *Setup -> Support Settings*. This allows cxconnect.ai to integrate fully with outbound email messages.
### Required: Activate Email Settings
It’s required to Enable Email Drafts if not already enabled contained in *Setup -> Support Settings*. This allows cxconnect.ai to integrate fully with outbound email messages.
 ###
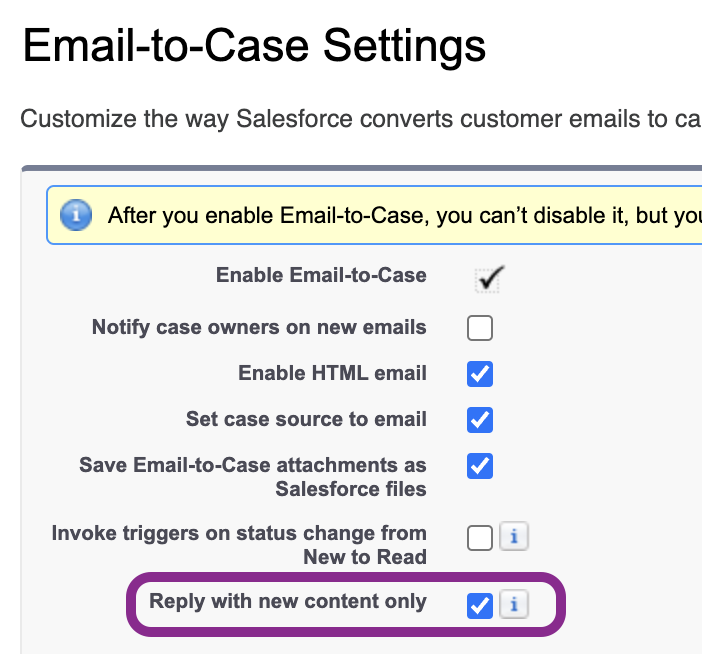
### Recommended: Enable “New Content Only”
It is recommended to set the following Email-To-Case setting so that the cxconnect.ai services don’t try to re-translate the entire email chain:
###
### Recommended: Enable “New Content Only”
It is recommended to set the following Email-To-Case setting so that the cxconnect.ai services don’t try to re-translate the entire email chain: